Water drop controller
- Thread starter bfgstew
- Start date
Hi Stewart,
Ah, I now see the returns at the end of DROPSn: are never executed (there's a GOTO immediately before)!
Also, I think you only need one DROPSn routine, so the code could become:
And similarly for the mainN: routines.
Cheers, Alan.
Ah, I now see the returns at the end of DROPSn: are never executed (there's a GOTO immediately before)!
Also, I think you only need one DROPSn routine, so the code could become:
Code:
drops:
	do
		gosub GetTheKeyPressed
			b3 = key_value
			goto DROPSn    ; Probably better as a GOSUB with DROPSn terminated by RETURN
		loop until key_value >0
	return		; ????

DROPSn:  ; The correct number of entries (Pn) are displayed on screen and the pause values ready for altering
		serout C.7,N2400,(254,157,#b3)
		pause 1000
		serout C.7,N2400,(254,1)
		pause 30
	        serout C.7,N2400,(254,134,"P1 -",254,139,#w7)
	      if b3 = 1 then goto inputdata
	        serout C.7,N2400,(254,192,"P2 -",254,197,#w8)
	        serout C.7,N2400,(254,202,"P3 -",254,207,#w9)
	      if b3 = 2 then goto inputdata
	        serout C.7,N2400,(254,148,"P4 -",254,153,#w10)
	        serout C.7,N2400,(254,158,"P5 -",254,163,#w11)
	      if b3 = 3 then goto inputdata
	        serout C.7,N2400,(254,212,"P6 -",254,217,#w12)
	        serout C.7,N2400,(254,222,"P7 -",254,227,#w13)
inputdata:
	      pause 30
	      do
		gosub Get4DigitNumberIntoW7
		loop until key_value > 0
    	      if b3 = 1 then goto quit
    	      do
	        gosub Get4DigitNumberIntoW8
	        loop until key_value > 0
	      do
	        gosub Get4DigitNumberIntoW9
	        loop until key_value > 0
     	      if b3 = 2 then goto quit
	      do
	        gosub Get4DigitNumberIntoW10
	        loop until key_value > 0
	      do
	        gosub Get4DigitNumberIntoW11
	        loop until key_value > 0
     	      if b3 = 3 then goto quit
	      do
	        gosub Get4DigitNumberIntoW12
	        loop until key_value > 0
	      do
	        gosub Get4DigitNumberIntoW13
	        loop until key_value > 0
quit:
	      goto mainC    ; This jump probably should be in "drops"
return ; Not currently executedCheers, Alan.
bfgstew
Senior Member
Ok, well as it is the zero that is giving me the headache at the moment I am concentrating on that, (I shall adjust coding as Alan has so kindly given me some good pointers later once this bit is out of the way).
Right I placed the piece of code
as suggested and it does give a zero to the screen but only if it is the first press of the key, if it isn't, it messes up the value on the screen??????? Anymore suggestions please guys?
Right I placed the piece of code
Code:
GetKeyPress:

  			' Wait until no key pressed
 	 Do
    		Gosub GetTheKeyPressed
  			Loop Until b1 = 0
 			 ' Wait until key pressed
 	 Do
   		 Gosub GetTheKeyPressed
  			Loop Until b1 <> 0
  			if key_value = 11 then : let key_value = 0 endif
Returnhippy
Ex-Staff (retired)
You want to put the code to recover zero in the 'GetKeyPressed' routine, then anything which calls that will get the right values.Anymore suggestions please guys?
If you have a keypad; "123 / 456 / 789 / *0#" I guess you are getting codes of 10, 11 and 12 for *0#, so just change 11 to 0 at its end.
Code:
GetKeyPressed:
  :
  If key_value = 11 Then
    key_value = 0
  End If
  Return
bfgstew
Senior Member
No, still not working Hippy!
As I mentioned if the 0 is pressed first and for 3 times and then any other number it works sort of as you get just the whole number, ie 8 instead of 0008, which is how I would like it to work, but if you go 1000 for instance the last 0 goes were the 1 is and then it gets lost?
As I mentioned if the 0 is pressed first and for 3 times and then any other number it works sort of as you get just the whole number, ie 8 instead of 0008, which is how I would like it to work, but if you go 1000 for instance the last 0 goes were the 1 is and then it gets lost?
bfgstew
Senior Member
Looking at this part of the code, I think this is the cause.
If a 0 is first keyed in it will come up as a 0 as it is in b1, but then the next keypress if it is a 0 it is multiplied by 10 so it stays as a 0, then again as 0 * 0 = 0 and then the last keypress if it is a 8 will come up as 8 instead of 0008. Some math work needed to sort this conundrum out????
Code:
Gosub GetKeyPress : w7 = b1
					serout C.7,N2400,(254,139,#w7)
					pause 30
  				Gosub GetKeyPress : w7 = w7 * 10 + b1
  					serout C.7,N2400,(254,139,#w7)
  					pause 30
  				Gosub GetKeyPress : w7 = w7 * 10 + b1
  					serout C.7,N2400,(254,139,#w7)
  					pause 30
 				Gosub GetKeyPress : w7 = w7 * 10 + b1
 					serout C.7,N2400,(254,139,#w7)
 					pause 30
Returnhippy
Ex-Staff (retired)
If you enter 0,0,0,8, either "8" or "0008" will be displayed depending on whether using #w7, which doesn't display leading zeroes, or using BINTOASCII or something else which does.If a 0 is first keyed in it will come up as a 0 as it is in b1, but then the next keypress if it is a 0 it is multiplied by 10 so it stays as a 0, then again as 0 * 0 = 0 and then the last keypress if it is a 8 will come up as 8 instead of 0008. Some math work needed to sort this conundrum out????
I'm not sure how you exactly mean but you could use a SERTXD or DEBUG to see what's in w7, whether it holds 1000 or something else. You need to determine if the error is in the values for display or simply an issue with what you are seeing on the display or how you are displaying them.but if you go 1000 for instance the last 0 goes were the 1 is and then it gets lost?
Added - Is it just the case you are not clearing the display and using #w7 ? If you enter "1234" you should see "1234" if you then enter "9876 are you seeing "9234", "9834", "9874", "9876" ?
I think this part is part of the problem:
You should modify your GetTheKeyPresssed sub so that a value such as 15 is used for no key pressed rather than 0.
Code:
		Gosub GetTheKeyPressed
  			Loop Until b1 = 0
 			 ' Wait until key pressed

	 Do
   		 Gosub GetTheKeyPressed
  			Loop Until b1 <> 0
Code:
		Gosub GetTheKeyPressed
  			Loop Until b1 = 15
 			 ' Wait until key pressed

	 Do
   		 Gosub GetTheKeyPressed
  			Loop Until b1 <> 15
hippy
Ex-Staff (retired)
Probably, or adding code which puts out leading zeroes before using #w7 in serout which won't add them. Handling number entry and display can get quite complicated depending on what you want, so the first thing is to define exactly what you want. For example ...it is these 0's that are the problem, as you say its not taking leading 0, so would changing to BINTOASCII cure it?
As you currently have it
Press "0" : Shows "0"
Press "0" : Shows "0"
Press "1" : Shows "1"
Press "2" : Shows "12"
Or
Press "0" : Shows "0"
Press "0" : Shows "00"
Press "1" : Shows "001"
Press "2" : Shows "0012"
Or
Press "0" : Shows "0000"
Press "0" : Shows "0000"
Press "1" : Shows "0001"
Press "2" : Shows "0012"
Did you modify the GetTheKeyPresssed sub as well?Thanks Nick, but that didn't work............
hippy
Ex-Staff (retired)
And what do you want it show ?Press "0" : Shows "0"
Press "0" : Shows "0"
Press "1" : Shows "1"
Press "2" : Shows "12"
That's how it shows on the screen exactly.
bfgstew
Senior Member
Ah, sorry Nick, missed that one, been a tad hectic this end, will give it another go and see if it works.............
Hippy,
I would like to see
press '0' see '0'
press '0' see '0'
press '2' see '2'
press '0' see '0'
keyed in '0', '0', '2' and '0' see 0020
In other words any key press 0 to 9 I would like to have on screen, so it easier to tell what value you are keying in
Hippy,
I would like to see
press '0' see '0'
press '0' see '0'
press '2' see '2'
press '0' see '0'
keyed in '0', '0', '2' and '0' see 0020
In other words any key press 0 to 9 I would like to have on screen, so it easier to tell what value you are keying in
hippy
Ex-Staff (retired)
It seems then, rather than always showing using #w7, just show the last key_value, and only show the full 'w7' number after entering the last digit, and use BINTOASCII for that to split the number into five digits, showing the four least significant.I would like to see
press '0' see '0'
press '0' see '0'
press '2' see '2'
press '0' see '0'
keyed in '0', '0', '2' and '0' see 0020
In other words any key press 0 to 9 I would like to have on screen, so it easier to tell what value you are keying in
bfgstew
Senior Member
Ok, had a try with the bintoascii and it does give the zero as I want it, but it seems to 'carry' 1 over to the last digit?
In the debug screen it shows-
key pressed '0' - b2 - '0'
key pressed '0' - b3 - '0'
key pressed '0' - b4 - '0'
key pressed '1' - b5 - '0'
b6 - '2'
It shows 5 values I am not sure if that is the correct sequence of the key presses but thats what comes up, similarly if you key in 1000
b2 - '0'
b3 - '1'
b4 - '0'
b5 - '0'
b6 - '1'
Probably a monumental mistake in this snippet!
In the debug screen it shows-
key pressed '0' - b2 - '0'
key pressed '0' - b3 - '0'
key pressed '0' - b4 - '0'
key pressed '1' - b5 - '0'
b6 - '2'
It shows 5 values I am not sure if that is the correct sequence of the key presses but thats what comes up, similarly if you key in 1000
b2 - '0'
b3 - '1'
b4 - '0'
b5 - '0'
b6 - '1'
Code:
Get4DigitNumberIntoW7: ;Coding to change the pause time via keypad
				Gosub GetKeyPress : w7 = b1
					serout C.7,N2400,(254,139,#b1)
					pause 30
  				Gosub GetKeyPress : w7 = w7 * 10 + b1
  					serout C.7,N2400,(254,140,#b1)
  					pause 30
  				Gosub GetKeyPress : w7 = w7 * 10 + b1
  					serout C.7,N2400,(254,141,#b1)
  					pause 30
 				Gosub GetKeyPress : w7 = w7 * 10 + b1
 				inc w7
 				bintoascii w7,b2,b3,b4,b5,b6
 				debug
 					serout C.7,N2400,(254,139,b3,b4,b5,b6)
 					pause 30
Returnbfgstew
Senior Member
I have come to the conclusion that Nick has the answer. After lots of modifications and fiddling with the code it still doesn't do the zero as I want, so looking through past posts and my code, the only logical answer is the b1 = 0 as on debug although it shows on the w7 slot the zero's going in, it's not registering them and looping all the time, hence why it gets lost.Did you modify the GetTheKeyPresssed sub as well?
So I had a go at trying to alter the GetTheKeyPressed sub to accommodate this but it will not work, so, cap in hand and tug me forelock guvn'r, can I have some help please...............
Stewart
Code:
GetTheKeyPressed:	;Keypad scan coding
		key_pos = 0
		key_value = 15
	 	High ROW1 : gosub ScanCol : low ROW1
	 	High ROW2 : gosub ScanCol : low ROW2
	 	High ROW3 : gosub ScanCol : low ROW3
	 	High ROW4 : gosub ScanCol : low ROW4
	 	Return

	 	ScanCol:
	 		if COL1 = 1 then : key_value = key_pos + 1 : endif
	 		if COL2 = 1 then : key_value = key_pos + 2 : endif
	 		if COL3 = 1 then : key_value = key_pos + 3 : endif
	 		key_pos = key_pos + 3
returnSorry to say Nick, but that still doesn't work, I get nothing from the keypad now..........
And you've changed these bits too? From
Code:
	 Do
    		Gosub GetTheKeyPressed
  			Loop Until b1 = 0
 			 ' Wait until key pressed
 	 Do
   		 Gosub GetTheKeyPressed
  			Loop Until b1 <> 0
Code:
	 Do
    		Gosub GetTheKeyPressed
  			Loop Until b1 = 15
 			 ' Wait until key pressed
 	 Do
   		 Gosub GetTheKeyPressed
Loop Until b1 <> 15hippy
Ex-Staff (retired)
You mean like the "inc w7" before the BINTOASCII which changes 00001 to 00002 and 01000 to 01001 ?b2 - '0'
b3 - '1'
b4 - '0'
b5 - '0'
b6 - '1'
Probably a monumental mistake in this snippet!
bfgstew
Senior Member
I think you have cracked it guys, all seems to working as it should. So a big thank you to Hippy, Alan (Allycat), Nickab12 and all the others that have contributed to my project. But there is one last conundrum! I have decided to add a flash and camera delayed trigger output and I can't seem to get it to run correctly. I will post the run part of the code as the main is to big.
Basically, hit the # key to start the run sequence, B.7 to go high, B.6 and B.5 stay low, now all 3 have variable pause times attached to them (B.7 is w7, B.6 is w6 and B.5 is w5). B.7 will stay high for the time in w7, while B.6 and B.5 stay low for the times in w6 and w5. B.7 to go low at the end of w7, B.6 to go high at the end of w6 and B.5 to go high at the end of w5, a pause time of 300ms is for B.6 and B.5 to stay high to trigger the camera and flash, then both go low, then the system resets for the next run.
It does go through the sequence but not necessarily in the correct order! Any ideas on how to improve this part please?
Stewart
Code:
mainA:
	do
	  gosub GetTheKeyPressed
		loop until key_value = 12 ; 12 is the # key on keypad and will start the run sequencw when pressed
			goto main1

main1:                                 ;Gives 1 drop from solenoid
	high B.7 : low B.6 : low B.5        ;outputs to solenoid, camera and flash
	    pause w7 : pause w5 : pause w6  ;variable pause times for each output
	    	low B.7 : high B.6 : high B.5
	    	pause 300
	    low B.6 : low B.5
goto initHi Stewart,
The : (colons) only allow you to put more than one instruction on a single line (they don't give any form of "parallel" operation), so as far as I can see your code is simply delaying for w7 + w5 + w6 and THEN switching B.7 , B.6 and B.5 at almost the same time (each PICaxe instruction takes a fraction of a millisecond). I think the code you want is:
However, note that the delay w5 will only start after w7 ends, etc. If you want the delayed events to be timed from a single starting point then you need to calcualate w5 = w5 - w7 and w6 = w6 - w5 - w7. But note that none of those calculations can be allowed to produce a negative result so you may need to sort the delays from lowest to highest first and then execute the delays and actions in the correct order (not a trivial task).
Also, if you're planning to adopt the "compact" code ideas that I posted a few days ago, you now appear to be using the b3 , b4 and b5 variables elsewhere, so you may need to ensure that there are no conflicts (multiple use) of any of those.
Cheers, Alan.
The : (colons) only allow you to put more than one instruction on a single line (they don't give any form of "parallel" operation), so as far as I can see your code is simply delaying for w7 + w5 + w6 and THEN switching B.7 , B.6 and B.5 at almost the same time (each PICaxe instruction takes a fraction of a millisecond). I think the code you want is:
Code:
....
pause w7 : low B.7
pause w5 : high B.6
pause w6 : high B.5
pause 300
low...
; NB: Sequence of w5,w6 and B.6,B.5 copied from previous code, but not as in textual descriptionAlso, if you're planning to adopt the "compact" code ideas that I posted a few days ago, you now appear to be using the b3 , b4 and b5 variables elsewhere, so you may need to ensure that there are no conflicts (multiple use) of any of those.
Cheers, Alan.
Last edited:
bfgstew
Senior Member
Thanks for that Alan, your 'compact' coding worked a treat.Also, if you're planning to adopt the "compact" code ideas that I posted a few days ago, you now appear to be using the b3 , b4 and b5 variables elsewhere, so you may need to ensure that there are no conflicts (multiple use) of any of those.
Will have a tweak with the coding to see if I can get 3 outputs working that way.
Much appreciated
Stewart
bfgstew
Senior Member
I may have looked a bit to deep into this last problem and lost myself a bit. So had a day away from it and the answer was staring me in the face.
The camera and flash delays are only needed after the drop sequence has finished, otherwise it just totally messes the whole thing up, without serious complex math. So w6 and w5 run after the last w variable in sequence. Hooray!
Now to tidy the whole thing up, a few tweaks here and there and then build the frame work up so I can start to use it.
Once again many thanks to those who helped and supported me.
Stewart
bfgstew
Senior Member
One of the tweaks I may do is rather than have the messages in the main programme, is to have them stored in the OLED EEPROM and call them from there, may save a bit of space on the main code? Anyhow, that is just a thought as I really want it to be user friendly if anyone wants to use it/build it?
bfgstew
Senior Member
Just a quicky!
I am trying to get the cursor to come on screen and blink where the digits are being inputted (w6, w7, w8 and so on) but I just can't fathom it. I can get it on using (254,14) but unable to get it blink and in the right place, it ends up at the end of the script on screen with a few bits of gibberish with it. Does this command have to be put into the OLED firmware (axe134Y) or just as a command in the normal programme I am running.
example -
When the screen is on it shows this P1-0ms P2-0ms
I would like the cursor to be on the 0 and blinking.
Input first digit and the 0 changes to whatever is keyed in - P1-2ms P2-0ms
cursor still on and blinking on the 2
Input 2nd digit - P1-25ms P2-0ms
cursor still on and blinking on the 5.
Then it will need to jump when the * is pressed to the 0 in P2-0ms and the process repeated until all digits are inputted.
Thanks in advance
Stewart
hippy
Ex-Staff (retired)
It's been a long time since I used the LCD cursor but you have to use the 'Cursor or Display Shift' commands and possibly the 'Entry Mode Set' commands to control the cursor how you want. Have a look in the LCD / OLED datasheets or those commands. All those can be sent using the 254,x format.
It's worth writing a small program to test cursor operation to discover and understand how it fully works before trying to apply it to an existing program.
It's worth writing a small program to test cursor operation to discover and understand how it fully works before trying to apply it to an existing program.
bfgstew
Senior Member
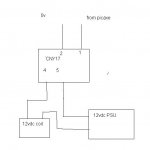
http://www.bitsbox.co.uk/data/CNY17-3.pdf
Can someone point me in the right direction with a CYN17-3 opto-isolator. I am using it to switch on a 12VDC 5W solenoid coil via pin B.7 on a 18M2+ chip with a regulated 5VDC supply.
Do I need resitors on the input and output Vcc? If so what values are required? I have looked at the attached data sheet, but it may as well be in Swahili, so rather than just say 'use a 75 and 1K resistor' is there a simple formula I can use for future reference please.
Thanks in advance.
Stewart
bfgstew
Senior Member
http://store.camozzi.co.uk/files/f027eda4-5670-453a-bbbd-9d7200c75727/Solenoids%20U7%20-%20U7EX%20-%20G7%20-%20A8%20-%20G93%20-%20H8.pdf
U72 - 12VDC 5W ED%100
All the info I have e, cheers.
U72 - 12VDC 5W ED%100
All the info I have e, cheers.
bfgstew
Senior Member
If the CNY17-3 is not up to it e, how about an SCR - http://www.alldatasheet.com/datasheet-pdf/pdf/235227/STMICROELECTRONICS/X006.html I have about a dozen of them in my box?
Hi Stewart,
No, an SCR (also known as a Thyristor) is unlikely to be suitable because it cannot be turned OFF by the input (gate) signal (a few special ones called "Gate Turn Off" do exist, but still need special drive arrangements). What you probably need is a Power FET, but I'll explain further:
The CNY17 is an (opto-) ISOLATOR, which electrically separates two circuits but doesn't necessarily give any AMPLIFICATION of the power being controlled to operate the coil/valve. However, using an isolator is probably quite a good idea because the power (voltage and Current) needed to operate the coil is quite "dangerous" (at least to a PICaxe) and any wiring mistakes might easily kill your PICaxe permanently.
The opto-isolator is basically a LED and a photosensor (Diode or Transistor) in a single package so that "information" is transferred by light without any electrical connection. Consider a TV remote control, the Remote Control sends control signals to the TV but if (for example) the Power Supply in the TV goes over-voltage (which might damage the TV circuits), the Remote Control cannot be damaged. However, this is not an ideal example because a RC is probably far cheaper to replace than a damaged TV, whilst the PICaxe is your "valuable" item.
You could actually make an optoisolator from the normal Techsupplies IR LED and IR optotransistor components facing each other in a short sleeve or tube. Perhaps cheaper and with the advantage that more of us in the forum will have experience of the specific components. I can only look at the data sheet for the CNY17, but the two parameters that make it look unsuitable for driving the coil are:
"DC current gain = ~100%", (i.e. it does NOT significantly amplify the current) and:
"Maximum Collector Current = 100mA" (i.e. much less than the hundreds of mA that the coil requires).
To use it as an isolator (i.e. to help protect your PICaxe) I would connect a resistor in the range of perhaps 220 ohms - 1k from the PICaxe output pin to pin 1 and pin 2 to the PICaxe "Earth/Ground". Then connect Pin 5 to the Positive 12 volt PSU and perhaps 10k from pin 4, which can deliver up to about 1mA to turn ON your power device. The phototransistor side (pins 5 and 4) is connected this way because you want the load (coil) current to be OFF when there is no signal (light) being passed across the package.
To feed sufficient current through the coil you need the type of component and circuit used to drive a DC motor; I believe the Techsupplies TRT003, FET IRF520 would be a suitable choice but I'm not an expert in using these devices. The circuit I would start with is to connect Power Supply negative to the FET Source (pin 3), one side of coil/valve to Drain (Pin 1 /tab) and the other side to PSU positive. Typically a 10 k resistor from Gate to Source (to ensure that current in the coil is normally OFF when there is no drive signal) and the "free" end of the 10k mentioned in the previous paragraph to Gate. ALSO, you probably need a "catching" diode to prevent the coil generating a large overswing voltage and possibly damaging the FET. The simplest arrangement is to connect a suitable diode across the coil, so that it is normally reverse biassed (i.e. cathode to + supply). However, this might make the valve close too slowly, so a resistor of perhaps 100 ohms (might need a higher wattage rating than normal) in series with the diode might help.
I hope that's not too much information to take in, in one go.
Cheers, Alan.
Last edited: