Rectifying 240V AC to PWM power to lights

premelec

Senior Member
Dippy - I think you have the wrog app note - The old AD7750 showed this circuit as patented by Schlumberger [Part now obsolete] I'm trying to attach a jpg of the old data sheet schematic...

ad8bc - suggest you not put BOTH hands in there at same time... :)
 

Attachments

premelec

Senior Member
OK the "AN559" app note I downloaded today from www.analog.com is quite different - it's a certificate of compliance for a power meter app with pretty pictures of how to do it etc--

Maybe I hit the wrong button on the AD site - I happened to have had a long time interest in the power to pulse chip so had old data sheet [and parts]... no problems.... I always wondered about the patent notice which now is gone... and I use transformers :)

Add: Indeed I hit the line _below_ the AN559 on AD URL and got the other document... sorry about that and my apologies for
extra trouble...
 
Last edited:

BrendanP

Senior Member
Thanks for everyones input. I appreciate people taking the time to write such well thought out, professional replies.

Just to bring the forum up to day with what I've done thus far. I have the dimmer/pwmed LDR going OK. The temperature now moves up and down by a tenth of one degree C as the globes brighten and dim under picaxe control.

I have run out code space on the 08M, I'll use a 28X1 for the final unit so I will be able to add more 'smarts' to the code and make it sit pretty well rock solid on 37.5.

I grinned a bit when i read of the warnings not to bread board 240V. I'm not sick of living yet.

I slipped the dimmer switch pcb back into the case it came in. Now Ive got the dimmer in its factory housing with the HV leads coming out where they are meant to at one end and the head of the LDR poking out of the hole in the case where the splined shaft for the trimpot use to protrude.

I butted the LDR and LED together and used heat shrink to join them mechanically with a light proof join. (I saw Manuka do this in a sil chip article).

With this setup I can clip some probes onto the LEDs legs and and pwm into it from the picaxe with a fair degree of safety while R&Ding.

Once again thanks for everyones help.
 

Dippy

Moderator
Excellent Brendan.

If you , or anyone, ever needs to do LED/LDR coupling and needs consistency (or can't be ar*ed to make one) then have a look at the optocouplers made by Silonex; models NSL-32 NSL-32SR. There may be others too.

My only moan (surprise,surprise) is temp-related drift if used in 'fussy' places -esp at the 'lower end' of the scale.

Well, I too must do some Mains work today - I'm going to do mine on breadboard, in the nude and in the bathtub. (Numpty Warning - I'm just kidding!).
 

inglewoodpete

Senior Member
08m out of code space? There's a challenge!

I have run out code space on the 08M
Brendan, Treat that as a challenge. Unless you have lots of excess code, of course.

I was surprsed how a bit of time and effort could 'shrink' code in an 08M. (Then someone else on the forum takes another 10% off it :rolleyes:)

Peter
 

BrendanP

Senior Member
You're right Pete I no doubt could shrink/tidy up the code a lot.

I have a LCD hooked up as well though and storing the messages uses lots of space. Ive got plenty of 28X1's here so its easier just to use one and be done with it. I know I could use external eeprom etc.

I want to have humidity and auto egg turning control as well so I'll need more room to run all that too.

To round out the thread on the project:


A linear actuator (wiper motor/piece of all thread rod) will pull/push a rack that holds the eggs. The rack will have adjustable 3mm rods that makes spaces like a chess board. By moving the rods on both axis you can acomodate different egg sizes.(ducks, geese, bantamns etc.) The square rack has holes drilled in it at say 10 mm intervals to allow the adjustment of the rods.

A toggle switch will be thrown either way depending at which end of stroke the actuator is. The picaxe will see the switch open or closed and thus will know which way to turn the motor. There will be another threaded rod which next to the actuator rod which will have nuts and washes on it that can be adjusted along the rod to control the length of stroke. This rod is attached to the frame at one end. The washer is held in between two lock nuts.
A goose egg has to rotated more than a bantam egg. The washes press against the toggle switch and the motor stops turning.

Humidity control will be a 20 litre bucket with a 12V muffin fan mounted on the lid blowing into the bucket. There a vacuum cleaner style hose coming out of the bucket lid and fed into the incubator. When the humidity is low the fan turns on and blows moisture laden air into the incubator. I might need a aquarium heater in the bucket to keep the water warm so it evaporates easy.
 

BrendanP

Senior Member
incubator temp control program

Ive been trying to figure out how to make the temp control program self stabilize so that the globes are held at a continual output. I figure they'll last longer that way. More importantly the temperature inside the incubator should remain the same or vary very, very little.

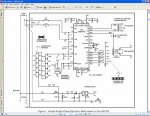
Heres how the program looks now if anyone wants to make a incubator at some stage. I think Im on the right track. The stability of the temperature is controlled by the delay in the gosubs ramp up and ramp down.

This sort of programming is quite interesting in that you need to create change yet also create stability.

The DS18B20 reading code is Prof. Andersons. I'll be buying my picaxe parts from him in future.

w11=200 'sets the heater level to start with

init:
pwmout 2,150,100 ‘ start pwm 'preheat setting
pwmduty 2,50 ‘ set pwm duty 'barely glowing
serout 7, t2400,("?f") 'clear screen move to pos 1 first line


main:
gosub checktemp
goto main


checktemp:
readtemp12 1,w0
calct:
b4 = w0 / 256 / 128
if b4 = 0 then Positive
w0 = w0 ^ $ffff + 1 ' take twos comp
positive:
W4 = W0 * 6 ' TC = value * 0.0625
W0 = W0 * 25 / 100
W4 = W4 + W0
gosub displaytemp
goto main

displaytemp:
b2 = W4 / 100
b3 = W4 % 100
if b4 = 0 then gosub displaytemp_1
return


displaytemp_1:
high 7
pause 50
serout 7,t2400,("?y0?x00")
pause 50
serout 7, t2400,("TEMP ")
pause 50
serout 7, t2400,(#b2,".")
b5 = b3 / 10
pause 50
serout 7, t2400,(#b5)
b6 = b3 % 10
pause 50
serout 7, t2400,(#b6)
low 7
if b2>=38 then gosub power_off
if b2<37 then gosub full_power
if b2=37 and b5>5 then gosub ramp_down
if b2=37 and b5<5 then gosub ramp_up
if b2=37 and b5=5 then gosub hold
return


power_off:
high 7
pause 50
serout 7,t2400,("?y1?x00")
pause 50
serout 7, t2400,("POWER OFF ")
pwmduty 2,0 ‘ set pwm duty 'power off
return


full_power:
high 7
pause 50
serout 7,t2400,("?y1?x00")
pause 50
serout 7, t2400,("FULL POWER ")
pwmout 2 , 99, 400
w10=400
pwmduty 2,w10 ‘ set pwm duty 'full power
return


ramp_up:
high 7
pause 50
serout 7,t2400,("?y1?x00")
pause 50
serout 7, t2400,("RAMP UP ")
inc w11
serout 7,t2400,("?y1?x30")
pause 50
serout 7, t2400,(#w11)
pwmduty 2,w11 ‘ set pwm duty
pause 10000
return


ramp_down:
high 7
pause 50
serout 7,t2400,("?y1?x00")
pause 50
serout 7, t2400,("RAMP DOWN ")
dec w11
serout 7,t2400,("?y1?x30")
pause 50
serout 7, t2400,(#w11)
pwmduty 2,w11 ‘ set pwm duty
pause 10000
return


hold:
high 7
pause 50
serout 7,t2400,("?y1?x00")
pause 50
serout 7, t2400,("HOLD ")
pwmduty 2,w11 ‘ set pwm duty
serout 7,t2400,("?y1?x30")
pause 50
serout 7, t2400,(#w11)
return
 

leds4u

New Member
Hi Brendan

How is the incubator going?

do you have the schematic handy that you could possibly post, as I am building an incubator for my sister and it would be wonderful to be able to copy yours if it's no trouble.

Thanks so much!
 

Taniwha

Senior Member
D.C. for lamps

Just My 10 cents worth, INCANDESCENT lamps will happily run on ac or dc ( I regularly test 48vdc power sustems with a light box load). Most GLS (standard light bulbs) will actually last longer if they are run at slightly less than 100%. Halogen lamps may give more heat for a given wattage, particularly the 12v Dicrohic lamps, however they need to run at full brightness regularly to prevent premature failure
 

BrendanP

Senior Member
I haven't been on the forum as Ive just come home to Vic from Queensland and started a new job down here.

The incuabtors have been comming along well. The cabinets are done (600mm X 600mm X 250mm) and sealed with estapol. I have bought two 120mm computer fans to provide forced draft. I will use a smaller fan ~40mm to provide humidity controll.

Im going to use gas struts on the lids, the lid also has a 3mm acrylic sheet set into it to provide view. The 120mm cooling fan is mounted onto the sheet, the sheet is stiffened by 12mm ally rhs. I should of got 4mm sheet or greater and I wouldn't of needed the ally.

I was working out auto egg turning in my mind. I was going to use a linear actuator in a push pull pull config. and laser cut sheet metal plate to hold the eggs to turn them when I came across this.

http://www.amazon.com/gp/offer-listing/B001ASYRRI/ref=sr_1_olp_1?ie=UTF8&s=hi&qid=1252222936&sr=1-1

This is far cheaper and easier to use. Just make the box a size to take these. If you want you could make the box capable of taking these stacked onto of each other. Just use a strong fan to ensure theres no air pocket inside the cabinet.

You can use a old fridge or esky as a cabinet if you want.

Our stupid Swedish blue ducks abandoned their eggs. Incubators are the way to go

I will post pictures of the project when its done which will explain things better than words.
 
Top