I2C with a MCP23016

GDSever

Member
I have been only partially successful in simulating I2C communication with a MCP23016 16-bit I/O extender - and I am not sure where I am going wrong. My first attempt was a circuit that read the inputs off GP1 and then set the LED states on GP0, but I could not get the writes to GP0 to ever work.

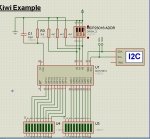
I decided to back off and try a different circuit using the tried & proven code that BCJKiwi put up on this thread... again, only partially successful. The LEDs are initially set on GP0, but the states never change... and the GP1 states never get set nor change.

Insight into where I am fouling things up would be most appreciated... it almost seems like the CLK signal or something else is not working, so the chip never gets off the ground... although I believe it has been wired correctly per the datasheet. I have attached the BAS and DSN files below for the BCJKiwi code project.
 

Attachments

BCJKiwi

Senior Member
Sorry but I haven't splashed out on VSM (yet) so can't really help further.

Does VSM simulate the Address lines properly? Are the address lines for the chip set up to match the code? A0, A1, A2 tied high or low with a 10K Resistor to set the chip address.
 

GDSever

Member
Yeah, I used a 3 position DIP switch and some 4k7 pull down resistors for that. I've tested using several different address settings, and they all seam to work fine getting to the simulated MCP23016 - at least for the first instruction. Then it hangs and stops updating... I've also tried using the I2C debugger to troubleshoot the I2C bus messages, but that has not been very fruitful either.
 

Attachments

BCJKiwi

Senior Member
Not sure that the DIL switch is adequate for the address lines.
Address pins must be tied high or low, they cannot float.

So the better option would be a set of single pole changeover switches, Addressline -> 4k7 -> Switch Common -> V+/V0

Pullups are required on the SDA/SCL lines - typically 4K7 to V+.
Again, I'm not sure if VSM would emulate a fault if they were not present.

If you haven't purchased the MCP23016s would recommend you work with the MCP23017s instead. Coding is only marginally different, chip is faster (if you need that), layout of the I/O is much more logical and the bus timing is internal. Still available in DIP package.

Will post alternate code later - bit busy right now.
 
Last edited:

GDSever

Member
I am fairly certain the way I've wired up the address pins is valid, and will appropriately represent high and low signals to the address pins. They are not floating...

And I know you don't have PICAXEVSM and can only see the portion that I took a screenshot of. The 4k7 resistors for the I2C bus are over on the Picaxe 28x1 side of the schematic. I can post the full screenshot if necessary - I just figured the MCP23016 was the important / pertinent part.

I do already have the 23016s, and 23017s do not have a part available in the PicaxeVSM environment, so I'm not sure I would have gone that route anyways. I'll have to look at them a little closer if my 23016 experiments are a bust.
 

BCJKiwi

Senior Member
Posted alternate code for MCP23017 in the original thread under code snippets.

If the circuit is right and you have the chips, why not test it on the breadboard?

That would confirm absolutely if the problem is in the circuit, program, or VSM
 

GDSever

Member
If the circuit is right and you have the chips, why not test it on the breadboard?
LOL. Exactly... I'll try to do that sometime this weekend. I guess its easier to obsess over the problem infront of you than confirm it is worth obsessing over... I guess was hoping that someone out there might confirm there being a problem with the simulator first.

Thanks again for the help - I'll let you know how the hardware prototyping goes.
 

BCJKiwi

Senior Member
Don't forget the current limiting resistors on the LEDs (not shown on your diagram). They are still needed on the MCP23016/7.

Note that the sample programs shown in the code snippets section relate to sinking the current. The circuit this code is for has a common supply (PWM'd) to all the LEDS with the MCP23016/7 sinking to 0V to complete the circuit and turn on the LED.
 
Last edited:

Labcenter

New Member
I've had a look at this and , AFAICS, there is a problem with the execution of the command :

Code:
hi2cout [%01000000],6,($00,$00)
If you single step the code with the MCP registers and the I2C debugger open you can see that only IODIR0 is reset and the I2C debugger reports only one command transmission - see attached.

I'm unfamiliar with the syntax of the PICAXE command set so am not best placed to comment further.

Iain.
 

Attachments

Technical

Technical Support
Staff member
If it is a bug in the simulator, using
hi2cout [%01000000],6,($00)
hi2cout [%01000000],7,($00)
should still work.

We'll have a more detailed look into it.
 

GDSever

Member
If it is a bug in the simulator, using
hi2cout [%01000000],6,($00)
hi2cout [%01000000],7,($00)
should still work.

We'll have a more detailed look into it.
I tried this in the attached .BAS and .DSN file attached above, and it does not seem to fix the problem - in fact the LEDs don't light up at all anymore. I will triple check the code, but I think there is a fundamental simulator issue here.

Interestingly enough, when I change the code to TRIPLE send the data, it works as expected... for example, this code actually makes the simulation work OK:

Code:
'#################################################
'# For PICAXE-28X1, MCP23016 driving LEDS        #
'#################################################
#picaxe 28x1
SetFreq m8
'#################################################
Init:
 hi2csetup i2cmaster,%01000000,i2cslow,i2cbyte
       '%0100 0  0  0  0 is the address with A0,A1,A2 all tied to 0V
       '%0100 A2 A1 A0 RW - there is no explanation for the 6th bit being '1'
       'If using multiple devices of different speeds on the bus,
       'then use this line to change speed and remove the [%01000000] in the next line.
 hi2cout [%01000000],6,($00,$00,$00)       'IRDIR0
       'Note:- MCP23016 documentation indicates this register pair (06 & 07) 
       'defaults to all 1's (all Inputs) on Power On Reset.
       'However if this register pair is not configured to all 0's (Outputs) there is no function when driving LEDS.
 hi2cout $0A,($00,$00,$00)   'IOCON0  
IO_1:
 hi2cout 0,(%01010101,%01010101,%01010101) 'GPO,GP1 Turn on each alternate output
       'A '0' bit to register 0 will turn ON current sink and a '1' will reverse to a current source
       'i.e. the port is not actually turned on or off but rather it's direction is reversed 
 pause 1250
 hi2cout 0,(%10101010,%10101010,%10101010)
 pause 250
 hi2cout 0,(%01010101,%01010101,%01010101)
 pause 1250
 hi2cout 0,(%10101010,%10101010,%10101010)
 pause 250
Goto IO_1 'Loop__________________
Is it possible that for some reason the first byte after the address is ignored? This also seems supported by the fact that replacing the first value of every hi2cout command with $00 also allows the simulation to run as expected - in other words, the first %10101010 or %01010101 seems superfluous.

I also noticed that I am using v5.1.7 of the programming editor, but I was assuming that shouldn't impact the PicaxeVSM simulator.
 
Last edited:

BCJKiwi

Senior Member
Update to the current editor. There are issues with the i2c slow / fast settings withthe earlier editor. I would not have expected tham to be an issue with VSM but there are num,erous enhancements/fixes in 5.2.0.
 

tiscando

Senior Member
I am also having trouble with the i2c IO expanders.
I was using the pca9555 i2c expander for the data bus when i'm experimenting with the atahdd model. I just can't get it to work!:confused:
I connected the i2c bus to the picaxe correctly with 4k7 pullup resistors, and connected a2, a1 and a0 to gnd (0v), and left $int$ floating
The problem is that these i2c expanders are not responding with these codes; the logic states of the io pins do not change (stay red/high).

Code:
i2cslave %01000000,i2cslow,i2cbyte
main:
pause 1000
writei2c 6,(0)
pause 10
writei2c 2,(%01101101)
goto main
Also, I tried the hardware solution, which didn't work either.
Code:
hi2csetup i2cmaster, %01000000,i2cslow,i2cbyte
main:
pause 1000
hi2cout 6,(2)
pause 10
hi2cout 2,(71)
goto main
then I've tried the pca9554, and I can't get this to work either.
Code:
i2cslave %01000000,i2cslow,i2cbyte
main:
pause 1000
writei2c 3,(0)
pause 10
writei2c 1,(71)
goto main
And this program:
Code:
hi2csetup i2cmaster, %01000000,i2cslow,i2cbyte
main:
pause 1000
hi2cout 3,(0)
pause 10
hi2cout 1,(71)
goto main
I Referred to: PCA9555.html and PCA9554.html.
Click on the 'pca955*-click here to view' hyperlink beside the datasheet picture
 
Last edited:
Top