Project hiccup and need help please

eclectic

Moderator
Ah, I see.

It's been a long day, been up since 5 and its beginning to take its toll.....................!

I have just thought, I do not need auto focus, as I will be focus stacking, the camera will be in manual mode........am I being dumb???
Dumb -NO.

We'll sort it tomorrow (depending on dear old Royal Mail :)

e
 

bfgstew

Senior Member
Cheers e...................:)

This is new to me and very exciting, I would hate it for my first project to fail, so come hell or high water this is going to work.

Cheers for your continued help and support, very much appreciated.

Stewart
 

eclectic

Moderator
I cut up a modern wired remote.
Three wires

1. +5
2. Gnd
3. Continually changes voltage

V+ add Gnd = Focus, then add wire 3
= Fire shutter.

Two CNY17 on Pins 4 and then 0

Pin4 adds Nikon1 to Nikon Gnd
Pin0 then adds Nikon 3 to Nikon Gnd

Then both pins go low.

All (IR / Stepper / Nikon) look to be working fine so far.

I'll tidy up details and schematic later.

Code:
#picaxe 08M2
; Use jumper when programming.
;;Then change to Pin0 as output
; Pins 1 + 2 = stepper
; Pin3 = IRIN
; Pin0 = Fire
; Pin4 = Focus
; Remote codes P+ =16 / P- =17 / 1 = 0 / 3 = 2
; Remote code (off) = 21 (Fire)

symbol delay = b10; alter as required
delay = 5
Symbol Focus = C.4
Symbol Fire = C.0

Main:
Irin 3, Infra
;sertxd (#Infra, "  ", #Delay, cr,lf) ; for testing
If Infra = 16 then
Delay = Delay + 1 MAX 254
endif

If Infra = 17 then
Delay = Delay - 1 MIN 5
endif
If infra = 0 then
gosub CW
endif

If infra = 2 then
gosub ACW
endif

If Infra = 21 then
High Focus
Pause 1500 ; alter *****
High Fire 
pause 100 ; Alter *************
Low Fire
endif

GOTO main

CW:
;Let pins = 0
 toggle 2 
pause delay 
toggle 1 
pause delay 
Return

ACW:
;Let pins = 0
toggle 1
pause delay 
toggle 2
pause delay 
Return
e
 

bfgstew

Senior Member
e - You are a star, thanks once again for your help.

Big box of bits from Bitsbox arrived today so sorting through that lot.

Going to rebuild board and fit into chassis box with DVD rail tomorrow, so looks good.

Look forward to seeing schematic so can intigrate with existing diagram ready for tomorrow.
 

eclectic

Moderator
Quick diagram attached.
Please carefully check that I haven't made a silly.

Use the Jumper while downloading, then move it so that
Pin0 is an output.

The 08M2 should now control

Pin0 = Fire
Pin1 and Pin2 = Stepper via 2803
Pin3 = Infra
Pin4 = Focus.

E (and OE)
 

Attachments

bfgstew

Senior Member
Thank you for that e, looks simple enough, even for me..................:p

The code you have provided, I take it, that will do the same as the original code, plus fire the camera this time? he he he he.
 

eclectic

Moderator
Thank you for that e, looks simple enough, even for me..................:p

The code you have provided, I take it, that will do the same as the original code, plus fire the camera this time? he he he he.
1. Well, the original code did fire my camera. :)

2. The code in post #84 still fires my camera.

3. Do NOT build anything permanent yet.

Very carefully develop your project in stages.

e
 

bfgstew

Senior Member
Hi all, hope everyone had a great Christmas?

Well, I have rebuilt the board with 2 opto's now as per post #86. The rail works fine on the original code, goes back and forth, just as it says on the tin. I just need to get the code right to trigger my Nikon. I have tried Eclectic's codes but non of them seems to work for me????
 

eclectic

Moderator
Hi all, hope everyone had a great Christmas?

Well, I have rebuilt the board with 2 opto's now as per post #86. The rail works fine on the original code, goes back and forth, just as it says on the tin. I just need to get the code right to trigger my Nikon. I have tried Eclectic's codes but non of them seems to work for me????
In what way doesn't it work?
I've just tried with my setup and it's OK.
Code from post #84

e
 

eclectic

Moderator
Nothing happens at all, its just dead, most strange e?
Ok, well you know that the stepper works, so remove it.
Just use output 0 and 4 connected to the Opto's.

My Nikon is in P (rogram) mode
and works with this stripped down code
Code:
#picaxe 08M2
 
Symbol Focus = C.4
Symbol Fire = C.0

Main:

High Focus
Pause 1500 ; alter *****
High Fire 
pause 100 ; Alter *************
Low Fire
pause 5000

GOTO main
e
 

bfgstew

Senior Member
I can't get it to do anything with that code, sorry e.
I tried all the other Sony codes for the remote but nothing seems to get it going?
 

eclectic

Moderator
Disconnect the stepper and run this code.
The corrct keys should show
0 2 16 17 and 21
and differing pause values

e
Code:
[#picaxe 08M2
; Use jumper when programming.
;;Then change to Pin0 as output
; Pins 1 + 2 = stepper
; Pin3 = IRIN
; Pin0 = Fire
; Pin4 = Focus
; Remote codes P+ =16 / P- =17 / 1 = 0 / 3 = 2
; Remote code (off) = 21 (Fire)
symbol delay = b10; alter as required
delay = 5
Symbol Focus = C.4
Symbol Fire = C.0

Main:
Irin 3, Infra
sertxd (#Infra, " ", #Delay, cr,lf) ;************** for testing
If Infra = 16 then
Delay = Delay + 1 MAX 254
endif
If Infra = 17 then
Delay = Delay - 1 MIN 5
endif
If infra = 0 then
gosub CW
endif
If infra = 2 then
gosub ACW
endif
If Infra = 21 then
High Focus
Pause 1500 ; alter *****
High Fire 
pause 100 ; Alter *************
Low Fire
endif

GOTO main

CW:
Return
ACW:
Return
 

bfgstew

Senior Member
Tried that and no good. Tried code on post 92 again, and that doesn't work now!!!!!!!!!!!!!!

Totally confused now.

The original code is fine with the stepper, can we get that re programmed for the 2 opto's. Clutching at straws now e...................May have to have some Christmas whiskey.......hic............
 

Goeytex

Senior Member
A Complete Diagram. Redundant but easier to read / follow

It is agonizing me to see such difficulty in getting what should be a very simple circuit to operate.

For prototyping I would suggest using a solderless breadboard instead of soldering on perfboard. It makes things soooo much easier to test/ change.
 

Attachments

bfgstew

Senior Member
Tested everthing out, yet again, looks like an iffy 3.5mm plug and guess what, I have no spares.................Off to get slightly tipsy now.
When I get some more plugs, will go through everything again and give you an update.
Many thanks for all your help.
Cheers
Stewart
 

bfgstew

Senior Member
Well, with all your help e, we now have it working to the last 2 codes, YIPPEE.

Can we now get it working with the original code? I tried it this afternoon, and it gets the camera focusing, but as it doesn't have the 0 output in the code it will not trigger the shutter. Is it just a matter of adding 0 as an output and putting high 0 or low 0 in the code atthe firing time?

Code:
' Macro focus rail driver
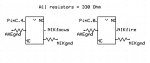
' Unipolar stepper (12V 1.8deg) connected to ULN2003A:
'    green, white, red, brown -> Out1-Out4
'    08m 2 -> ULN In2
'    08m 1 -> ULN In3
' Out4 -> optocoupler for shutter triggering (tip+, sleave-)
' IR detector codes:
'    CH+      back focus
'    CH-      front focus
'    NN       steps in one slide (in 0.01mm)
'    AV/TV    the next slide will be continuous (any key to interrupt)
'    Vol-     mark focus (front) and start moving focus back; mark focus end by any key
'		slide to the front of the stack
'    Power    start shooting

symbol slack = 5          ' how many micro steps to add when changing direction 
symbol steppause = 1   ' larger number will make it go slower 
'                                  - useful if you have a stepper with very few steps per revolution

symbol stepc     = b0
symbol s 	= b1
symbol i 	= b2
symbol direction = b3
symbol nsteps    = b4
symbol nframes   = b5
symbol nslide    = b6
symbol j	 = b7
symbol irflag    = b8
symbol olddir    = b9
symbol contflag  = b10

high 1
high 2
low 4

'           (nsteps)
eeprom 0, (20)

read 0, nsteps

contflag=0

main:
	infrain2
	if infra<10 then
		infra=infra+1
		infra=infra//10
		nsteps=infra*10
		pause 500
		infrain2
		infra=infra+1
		infra=infra//10
		nsteps=nsteps+infra
		write 0, nsteps
	elseif infra=37 then
		contflag=1
		pause 500
		infrain2
		pause 500
	endif
	select infra
	case 17 ' front focus
		direction=2
		gosub slide
	case 16 ' back focus
		direction=0
		gosub slide
	case 19 ' Vol-  - mark focus start
		nslide=0
		irflag=0
		pause 200
		do
			pause 200
			direction=0
			gosub slide
			nslide=nslide+1
			'pause 200
		loop while irflag=0
		pause 2000
		for j=1 to nslide
			direction=2
			gosub slide
		next j
		gosub slide
		direction=0
		gosub slide
	case 21 ' Power - start shooting run
		gosub shoot
		for j=1 to nslide
			direction=0
			gosub slide
			gosub shoot
		next j
	endselect
	'debug
	pause 500
	goto main

shoot:
	pause 5000    
	high 4	' shoot
	pause 400
	low 4
	pause 3000    ' wait before the next slide (exposure time)
	return

	
slide:
	if direction<>olddir then	' remove sprocket slack
		for i=1 to slack
			gosub onestep
		next i 
	endif
	irflag=0
lup:
	for i=1 to nsteps
		gosub onestep
		pause steppause
	next i
	if irflag=0 AND contflag=1 then goto lup
	contflag=0
	olddir=direction
	return

onestep:
'	s=direction*2
	stepc=stepc+direction-1
	let stepc=stepc // 4
	lookup stepc, (%00000110, %00000100, %00000000, %00000010), s
	let pins=s
	if pin3=0 then
		irflag=1
	endif
	'pause 1
	return
 
Last edited by a moderator:

eclectic

Moderator
The output 0 sounds feasible.

Can't help at the moment, but will have some time tomorrow.

In the meantime, have a play.
It could be an excellent learning experience.

Just make sure that you keep notes,
and save changes,
for every version.

e
 

bfgstew

Senior Member
Success at last.

Adding high 0 after the high 4 did the trick and now works a treat.

Many, many thanks to Eclectic for his guidance and knowledge and others who have helped, it's much appreciated.

To those who are new and are reading this. Listen to these guys, they know what they are on about. Double, if not triple check your project, it's easy to miss a simple connection.

Will post photo of completed unit so you can see my handywork.

Thanks once again to you all.

Stewart
 
Last edited:

bfgstew

Senior Member
As promised my completed project.

I have tried to keep it as tight as possible in a box with a cover on so it keeps it out of harms way more than anything.

Once again thanks for all your help on this project.

Stewart

rail-1.jpg

rail-3.jpg
 

bfgstew

Senior Member
Certainly am, thanks.

Now need to think of some more photographic Picaxe projects to do..........:D
 

eclectic

Moderator
Certainly am, thanks.

Now need to think of some more photographic Picaxe projects to do..........:D
Flash triggered by LASER.

Camera triggered by PIR

Camera triggered by SRF05 ultrasonic (variable trigger distance)

Styrophil's flash work.

.......

e
 
Top