'++++++++++++++++++++++++++++++++++++++++++++++++++++++++++
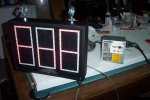
'This program will drive a 3 digit seven segment display
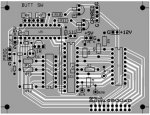
'The hardware consists of a Picaxe 20X2 and a MAX7219 plus two Darlington arrays (UDN2982 and ULN2003)
'The SERTXD commands were used during debuging and are left in the code but commented out
'++++++++++++++++++++++++++++++++++++++++++++++++++++++++++
' DIRECTIVES
#picaxe 20X2 ' specify the PICAXE processor
#no_data ' speed up the download
#no_table ' speed up the download
#terminal off ' disable terminal window
' PIN ASSIGNEMENTS
Symbol load = C.2 ' briefly pulse C.2 to transfer data to LEDs
Symbol But = B.0
Symbol SW = B.2
Symbol Green = B.6
Symbol Red= B.4
Symbol SIGNL = C.0
Symbol Counter = W0
Symbol Valones = b2
Symbol Valtens = b3
Symbol Valhund = b4
b5=0
Counter=1
' Register addresses for the MAX7219
symbol decode = 9 ' decode register; specify digits to decode
symbol brite = 10 ' intensity (brightness) register; 15 = 100%
symbol scan = 11 ' scan-limit register; specify how many digits
symbol on_off = 12 ' 1 = display on; 0 = display off
' ============================= Begin Main Program =============================
setfreq m64
dirsb = %11111010 ' set portB as all outputs (except B.0 and B.2)
dirsc = %10111110 ' set portC as outputs (except C.6)
hspisetup spimode00,spifast ' set up hspi
' Initialize MAX7219
hspiout (scan,2) ' set scan limit for digits 0-2
pulsout load,1
hspiout (brite,15) ' set brightness to 5 (15 = 100%)
pulsout load,1
hspiout (decode,0) ' set BCD decoding for digits 0-3
pulsout load,1
hspiout (on_off,1) ' turn display on
pulsout load,1
'********TO SHOW THE INITIALS OF THE CLUB "FETCH n FLY"
hspiout (1,71) ' 1st LED from left = "F"
pulsout load,1
hspiout (2,21) ' 2nd LED from left = "n"
pulsout load,1
hspiout (3,71) ' 3rd LED from left = "F"
pulsout load,1
'***************************************
Pause 500
If PinC.0 = 1 then goto TV 'Check to see if numbers will be advanced usinf an IR controller
If PinB.2=0 then High B.6 else Low B.6
endif
If PinB.2=1 then High B.4 else Low B.4
endif
Jump2:
button B.0,1,254,254,b5,1,pushed1
hspiout (brite,2) ' set brightness to 5 (15 = 100%)
pulsout load,1
pause 2500
hspiout (brite,15) ' set brightness to 5 (15 = 100%)
pulsout load,1
pause 2500
'sertxd ("Waiting for first push ")
Goto Jump2
Pushed1:
Sertxd ("First button PUSH ")
b5=0
hspiout (decode,15) ' set BCD decoding for digits 0-3
pulsout load,1
Calc:
'Sertxd ("CALCULATING ")
Valhund=counter/100
If Valhund=0 then Let Valhund=15
endif
Valtens=counter//100
Valtens=Valtens/10
if Counter>99 then goto Jump1
If Valtens=0 then let Valtens=15
endif
Jump1:
Valones=Counter//100
Valones=Valones//10
' Send data to the four digits
Display:
Sertxd ("Start display ")
hspiout (1,Valhund) ' 1rst LED from left
pulsout load,1
hspiout (2,Valtens) ' 2nd LED from left
pulsout load,1
hspiout (3,Valones) ' 3rd LED from left
pulsout load,1
Pause 500
For b5=0 to 1
hspiout (brite,1) ' set brightness to 5 (15 = 100%)
pulsout load,1
Pause 1000
hspiout (brite,15) ' set brightness to 5 (15 = 100%)
pulsout load,1
Pause 2000
next b5
b5=0
If PinC.0 = 1 then goto TV
Sig:
If PinC.0 = 1 then goto TV
button B.0,1,254,254,b5,1,pushed
If PinB.2=0 then High B.6 else Low B.6
endif
If PinB.2=1 then High B.4 else Low B.4
endif
Pause 5000
'sertxd ("Waiting for next push ")
Goto Sig
Pushed:
'Sertxd ("Pushed again ")
If PinB.2=1 then Decr
INCR:
Counter=Counter+1
'sertxd (#Counter," Counter increased ")
b6=0
Goto Calc
Decr:
Counter=Counter-1
'sertxd (#Counter," Counter Decreased ")
b6=0
Goto Calc
TV:
'sertxd ("Waiting for TV Signal ")
high B.6
high B.4
'sertxd (" "#Counter," TV ")
If PinC.0 = 0 then goto sig
irin [1000,TV],C.6,b6 ;wait for new signal
if b6 = 16 then INCR ;Increase
if b6 = 17 then DECR ;Decrease
if b6<>16 and b6<>17 then goto TV