Here wat's going to happen (hopefully): you should end up with the abillity to at least control the mouse with two variable resistors, at most control any output device supported by a chip using your PC.
First is first, I didn't come up with all the info for this project somone else provided a lot of info on the PC communication. Read the link below unless you are competent at VB (Visual Basic - some complex program creating software from Microsoft) in which case you may want to just look at the circuit diagrams and codes.
http://www.instructables.com/id/Control-real-world-devices-with-your-PC/
I orriginaly had the idea of trying to use a PICAXE to control the mouse when I was constrained to using a laptop for two weeks and just hated the touchpad and so wanted to come up with some kind of solution. Anyway, after vering quite far of subject I discovered the article above. It explaines how to interface a PICAXE with a computer (via the download cable) and shows how to send a variable resistor reading to the computer, and turn on a light using buttons on the PC, controlling a servo on the PIC.
So, I hacked it. And after a while of mucking around with VB (I have just started using it and it is highly recomended) I got the PIC to sent two varible resistor readings and then the VB program to turn them into the pointer moving. The "Framerate" of the pointer isn't great but it does work.
Here's what to do. Download VB from this link
http://www.microsoft.com/express/download/
Make a new program like in the instructables guid then add two label to the design. Double click on the design and then copy the folowing code and replace all the code already present:
Imports System.IO
Imports Strings = Microsoft.VisualBasic ' so can use things like left( and right( for strings
Public Class Form1
Public Declare Sub Sleep Lib "kernel32" (ByVal dwMilliseconds As Integer) ' for sleep statements
Dim WithEvents serialPort As New IO.Ports.SerialPort ' serial port declare
Dim PicaxeRegisters(0 To 13) As Byte ' registers b0 to b13
Private Sub Form1_Load(ByVal sender As Object, ByVal e As System.EventArgs) Handles Me.Load
Timer1.Enabled = True ' put this in code as defaults to false when created
Timer1.Interval = 1 ' 0.5 seconds
Array.Clear(PicaxeRegisters, 0, 13) ' probably not needed as array declared blank
End Sub
Private Sub Timer1_Tick(ByVal sender As System.Object, ByVal e As System.EventArgs) Handles Timer1.Tick
Call SerialTxRx() ' talk to picaxe
End Sub
Sub SerialTxRx()
Dim DataPacket(0 To 17) As Byte ' entire data packet "Data"+14 bytes
Dim i As Integer ' i is always useful for loops etc
Label1.Text = "" ' clear the text on the screen
For i = 0 To 3
DataPacket(i) = Asc(Mid("Data", i + 1, 1)) ' add the word "Data" to the packet
Next
For i = 0 To 13
DataPacket(i + 4) = PicaxeRegisters(i) ' add all the bytes to the packet
Next
If serialPort.IsOpen Then
serialPort.Close() ' just in case already opened
End If
Try
With serialPort
.PortName = "COM1" ' Most new computers default to com1 but any pre 1999 computer with a serial mouse will probably default to com2
.BaudRate = 2400 ' 2400 is the maxiumum speed for small picaxes
.Parity = IO.Ports.Parity.None ' no parity
.DataBits = 8 ' 8 bits
.StopBits = IO.Ports.StopBits.One ' one stop bit
.ReadTimeout = 10 ' milliseconds so times out in 1 second if no response
.Open() ' open the serial port
.DiscardInBuffer() ' clear the input buffer
.Write(DataPacket, 0, 18) ' send the datapacket array
Call Sleep(150) ' 100 milliseconds minimum to wait for data to come back and more if data stream is longer
.Read(DataPacket, 0, 18) ' read back in the data packet array
.Close() ' close the serial port
End With
Dim LabelString1 As String
Dim LabelString2 As String
LabelString1 = Str(DataPacket(5))
Label1.Text = LabelString1
LabelString2 = (DataPacket(6))
Label2.Text = LabelString2
Catch ex As Exception
'MsgBox(ex.ToString)' uncomment this if want to see the actual error message
Label1.Text = "Timeout" ' will display this if picaxe not connected etc
End Try
Dim A As Double = CDbl(DataPacket(5))
If A < 128 Then
A = A * 2
A = A + 1
A = 255 - A
A = A * -1
Else
A = A - 127
A = A - 1
A = A * 2
End If
If A < 10 Then
If A > -10 Then
A = 0
End If
End If
Dim B As Double = CDbl(DataPacket(6))
If B < 128 Then
B = B * 2
B = B + 1
B = 255 - A
B = B * -1
Else
B = B - 127
B = B - 1
B = B * 2
End If
If B < 10 Then
If B > -10 Then
B = 0
End If
End If
Me.Cursor = New Cursor(Cursor.Current.Handle)
Cursor.Position = New Point(Cursor.Position.X + (A), Cursor.Position.Y + (B))
End Sub
End Class
Find the section that says "COM1" and replace this with your PICAXE COM port.
Now build the program (explained in 1st link).
At the bottom when it has build the program there should be some text in which should be two file locations. The second is where the new program you've just built is. Find it (it will be a ".exe" called whatever the program name you typed was) and keep a not of it.
All the VB stuff is better explained in the first link.
Now... the PICAXE.
New basic file and type this exactly:
setfreq m8
This should set your PIC working at 8MHz (makes things faster) so from now on when you download to this chip you will have to set you programming editor to 8MHz (View/options). You can change it back to 4MHz by typing
"setfreq m4" in a new program.
Note: I am using an 08M that has been set to 8MHz. I seen no reason why other chips wont work with external 8MHz osc's but havn't tested it.
Now download the attached .bas file to your chip, remembering to set the editors speed to 8MHz.
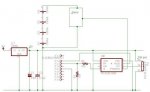
Attach two varible resistors (I used two three pin presets attached between the supply voltage and ground) to analogue pins 1 and 2.
http://www.hippy.freeserve.co.uk/picaxepo.htm (useful and quick link)
Now study the attached picture and focus on the download socket arrangment. Basicaly whichever lead you normaly conect to pin 2 on an 08M chip is now conected to pin4 via a 22k resistor and the wire is grounded via a 10k resistor. the other two lead that you use when downloading programs stay the same (pin 7 and ground).
Right.. I... think thats everything! Try it!
Have the PIC powered up first the set the program going. With the variable resistors centered the mouse shouldn't move. When you turn them eiter way the mouse should move.If your mouse goes bazurk, Alt+F4 it the keyboard shrotcut to close the current program and you can switch between programs with Alt+Tab - that should allow you to stop the program running without using the mouse.
If anyone has any ideas on how to increase the speed of the process that would be great and I am working on a mouse click function.
Private mail me with problems as I am sure there will be loads and they'll be easy to deal with individualy.
If you want to edit it feel free but can you tell me and at least mention me if you distribute it on your site.
By God, thats a long message .
.
Well done if your still reading.
Hope you have fun,
Happy Hacking!
First is first, I didn't come up with all the info for this project somone else provided a lot of info on the PC communication. Read the link below unless you are competent at VB (Visual Basic - some complex program creating software from Microsoft) in which case you may want to just look at the circuit diagrams and codes.
http://www.instructables.com/id/Control-real-world-devices-with-your-PC/
I orriginaly had the idea of trying to use a PICAXE to control the mouse when I was constrained to using a laptop for two weeks and just hated the touchpad and so wanted to come up with some kind of solution. Anyway, after vering quite far of subject I discovered the article above. It explaines how to interface a PICAXE with a computer (via the download cable) and shows how to send a variable resistor reading to the computer, and turn on a light using buttons on the PC, controlling a servo on the PIC.
So, I hacked it. And after a while of mucking around with VB (I have just started using it and it is highly recomended) I got the PIC to sent two varible resistor readings and then the VB program to turn them into the pointer moving. The "Framerate" of the pointer isn't great but it does work.
Here's what to do. Download VB from this link
http://www.microsoft.com/express/download/
Make a new program like in the instructables guid then add two label to the design. Double click on the design and then copy the folowing code and replace all the code already present:
Imports System.IO
Imports Strings = Microsoft.VisualBasic ' so can use things like left( and right( for strings
Public Class Form1
Public Declare Sub Sleep Lib "kernel32" (ByVal dwMilliseconds As Integer) ' for sleep statements
Dim WithEvents serialPort As New IO.Ports.SerialPort ' serial port declare
Dim PicaxeRegisters(0 To 13) As Byte ' registers b0 to b13
Private Sub Form1_Load(ByVal sender As Object, ByVal e As System.EventArgs) Handles Me.Load
Timer1.Enabled = True ' put this in code as defaults to false when created
Timer1.Interval = 1 ' 0.5 seconds
Array.Clear(PicaxeRegisters, 0, 13) ' probably not needed as array declared blank
End Sub
Private Sub Timer1_Tick(ByVal sender As System.Object, ByVal e As System.EventArgs) Handles Timer1.Tick
Call SerialTxRx() ' talk to picaxe
End Sub
Sub SerialTxRx()
Dim DataPacket(0 To 17) As Byte ' entire data packet "Data"+14 bytes
Dim i As Integer ' i is always useful for loops etc
Label1.Text = "" ' clear the text on the screen
For i = 0 To 3
DataPacket(i) = Asc(Mid("Data", i + 1, 1)) ' add the word "Data" to the packet
Next
For i = 0 To 13
DataPacket(i + 4) = PicaxeRegisters(i) ' add all the bytes to the packet
Next
If serialPort.IsOpen Then
serialPort.Close() ' just in case already opened
End If
Try
With serialPort
.PortName = "COM1" ' Most new computers default to com1 but any pre 1999 computer with a serial mouse will probably default to com2
.BaudRate = 2400 ' 2400 is the maxiumum speed for small picaxes
.Parity = IO.Ports.Parity.None ' no parity
.DataBits = 8 ' 8 bits
.StopBits = IO.Ports.StopBits.One ' one stop bit
.ReadTimeout = 10 ' milliseconds so times out in 1 second if no response
.Open() ' open the serial port
.DiscardInBuffer() ' clear the input buffer
.Write(DataPacket, 0, 18) ' send the datapacket array
Call Sleep(150) ' 100 milliseconds minimum to wait for data to come back and more if data stream is longer
.Read(DataPacket, 0, 18) ' read back in the data packet array
.Close() ' close the serial port
End With
Dim LabelString1 As String
Dim LabelString2 As String
LabelString1 = Str(DataPacket(5))
Label1.Text = LabelString1
LabelString2 = (DataPacket(6))
Label2.Text = LabelString2
Catch ex As Exception
'MsgBox(ex.ToString)' uncomment this if want to see the actual error message
Label1.Text = "Timeout" ' will display this if picaxe not connected etc
End Try
Dim A As Double = CDbl(DataPacket(5))
If A < 128 Then
A = A * 2
A = A + 1
A = 255 - A
A = A * -1
Else
A = A - 127
A = A - 1
A = A * 2
End If
If A < 10 Then
If A > -10 Then
A = 0
End If
End If
Dim B As Double = CDbl(DataPacket(6))
If B < 128 Then
B = B * 2
B = B + 1
B = 255 - A
B = B * -1
Else
B = B - 127
B = B - 1
B = B * 2
End If
If B < 10 Then
If B > -10 Then
B = 0
End If
End If
Me.Cursor = New Cursor(Cursor.Current.Handle)
Cursor.Position = New Point(Cursor.Position.X + (A), Cursor.Position.Y + (B))
End Sub
End Class
Find the section that says "COM1" and replace this with your PICAXE COM port.
Now build the program (explained in 1st link).
At the bottom when it has build the program there should be some text in which should be two file locations. The second is where the new program you've just built is. Find it (it will be a ".exe" called whatever the program name you typed was) and keep a not of it.
All the VB stuff is better explained in the first link.
Now... the PICAXE.
New basic file and type this exactly:
setfreq m8
This should set your PIC working at 8MHz (makes things faster) so from now on when you download to this chip you will have to set you programming editor to 8MHz (View/options). You can change it back to 4MHz by typing
"setfreq m4" in a new program.
Note: I am using an 08M that has been set to 8MHz. I seen no reason why other chips wont work with external 8MHz osc's but havn't tested it.
Now download the attached .bas file to your chip, remembering to set the editors speed to 8MHz.
Attach two varible resistors (I used two three pin presets attached between the supply voltage and ground) to analogue pins 1 and 2.
http://www.hippy.freeserve.co.uk/picaxepo.htm (useful and quick link)
Now study the attached picture and focus on the download socket arrangment. Basicaly whichever lead you normaly conect to pin 2 on an 08M chip is now conected to pin4 via a 22k resistor and the wire is grounded via a 10k resistor. the other two lead that you use when downloading programs stay the same (pin 7 and ground).
Right.. I... think thats everything! Try it!
Have the PIC powered up first the set the program going. With the variable resistors centered the mouse shouldn't move. When you turn them eiter way the mouse should move.If your mouse goes bazurk, Alt+F4 it the keyboard shrotcut to close the current program and you can switch between programs with Alt+Tab - that should allow you to stop the program running without using the mouse.
If anyone has any ideas on how to increase the speed of the process that would be great and I am working on a mouse click function.
Private mail me with problems as I am sure there will be loads and they'll be easy to deal with individualy.
If you want to edit it feel free but can you tell me and at least mention me if you distribute it on your site.
By God, thats a long message
.Well done if your still reading.
Hope you have fun,
Happy Hacking!
Attachments
-
440 bytes Views: 16
-
 14.3 KB Views: 61
.jpg)
.jpg)
.jpg)
.jpg)