Difficulty connecting Srf05 to Picaxe28x1 & Solder Assistance**

MaltiK

Member
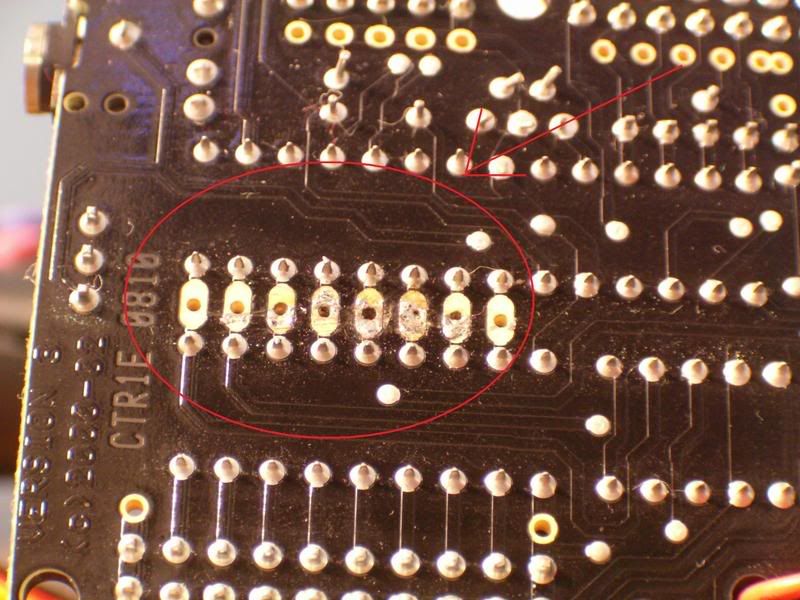
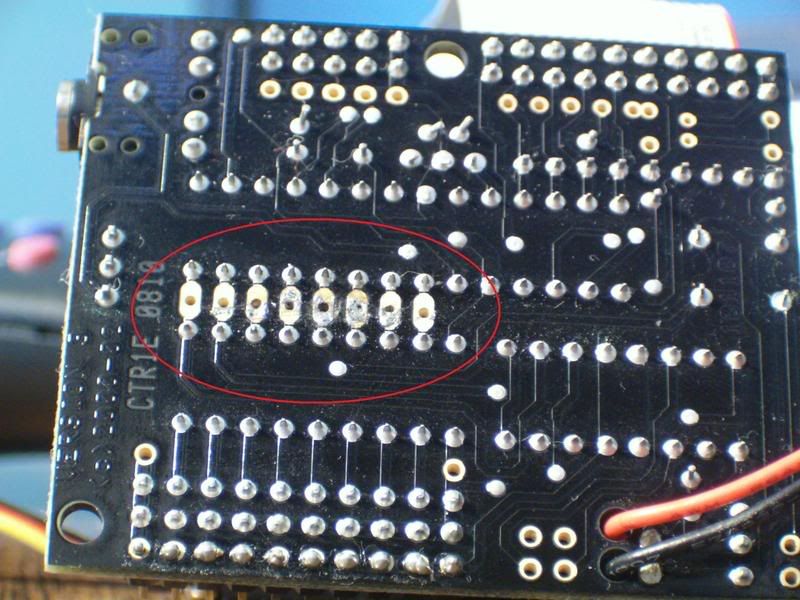
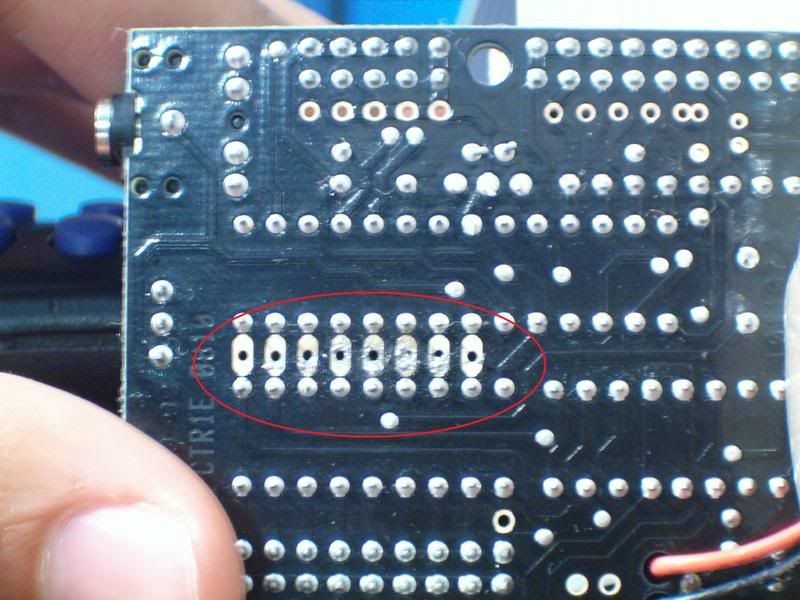
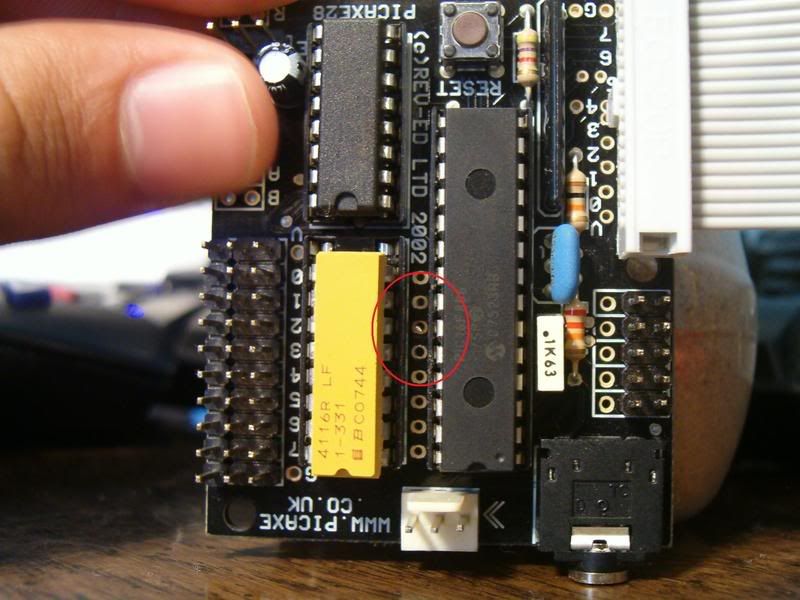
OK, at first I tried using the ribbon cable and it got annoying because I wasnt certain which port would be for which wire, and now I am facing even more difficulties. I attempted to solder a wire to the actual board of the Picaxe, was I supposed to? Or use a pin, now I have excess solder that I think might mess up the connecting, because, as you can see from one of my pictures, its an annoying glob. I have already tried a Vacuum Desoldering Tool, Desoldering Braid, and a Solder Pump So I conclude with two questions:

1. How do I get rid of some of that solder?

2. What is a more practical way to connecting the Sonar to the Microcontroller?


Michael 2727

Senior Member
If you can't solder to save your own life, don't use a real PCB as a guinea pig.
Especially an expensive one.
Get some practice on dead computer boards or something first, remove, replace
the components untill you can at least do it without damaging tracks/pcb.
Single Sided boards for beginners, Double Sided are a pain in the ass at the best of times.

In your case 1.6mm to 2mm desolder braid should be fine, the heavier the braid the more heat
you need. Overheating kills PCBs very quickly. You will never get all the solder off, the
pad is now tinned forever, which isn't a bad thing, just not shiny and neat.

Looks as you have removed most of the solder.
I would be inserting Header Pins onto the board before you do any real damage.

You can gently poke the solder out of the hole with a pin, if the solder won't come
out easily you need to quickly refill the hole with very fine solder and even quicker
desolder the hole again. Watch the solder as it soaks into the braid to see if it is
getting sucked out of the hole, when the flow stops remove the braid/heat fast.

In most cases you only get 1 or 2 shots at removal/replace before the PCB is damaged.
You can use Metho (alcohol) to clean up old burnt flux before you start.
And a good investment is a small bottle of no residue solder flux for double sided boards.

And if you don't have a good iron with a small 0.5mm to 2mm plated tip, don't even bother.

Rule #1 Always protect the PCB.
 

Dippy

Moderator
Removing components and/or solder from a double sided board with pth can be a bitch. All I can suggest is holding the pcb upright and placing your solder sucker tip on the hole as flush as you can . Then apply the soldering iron briefly on the other side on the corresponding pad for a second and press the suck button.

As Michael says, too much hot stuff will damage the board. Always use headers, pins or terminals.
I would guess that an SIL pin header strip would pop in that space nicely. In-out soldering is asking for trouble and , potentially, an early bath.
 

westaust55

Moderator
Last edited:

hippy

Ex-Staff (retired)
I'll second the PITA comments about unsoldering boards, especially from PC motherboards. I've near given up salvaging components from them unless I consider it really worthwhile and then it's usually a case of dremmeling round each component and hacksawing between legs and removing a piece of PCB per pin at a time. If lucky one can dremmel out a PCB section with a desirable component on it, file it square and solder flying wires to it.

For removing solder from PTH holes, I usually apply more solder, get it all molten and use a solder-sucker. A good chance of success but not always. As stated, after a few tries, give up or risk damaging the board, lifting tracks and pads etc.

Solder splats and bridges can often be removed with a fine solder tip with surface tension pulling the bridge apart and braid should work there ( never used it ), then solder to the pads rather than trying to push components or wires through the holes. Worse case scenario, cut the solder away with a scalpel or craft knife ... taking care of course, because it really can hurt and dried on blood smells real bad when being soldered to.

If a pad's damaged, follow the track back to another component then solder a flying wire there.
 

sputz

Member
wrt header pins and sockets, I repeat what I said in your other thread:


what country are you in. Knowing your location, we can give an indication where to get these if you are having difficulties sourcing them.
I went through these growing pains and I can talk about my experience and based on the advice from the kind folks here made this. http://picasaweb.google.com/fployd/AntaresRover?authkey=pm8LrZSx3VU

I used a variety of connectors when making the rover. Used a dip plug, used idc connectors, soldered pins and crimped some molex.

I soldered headers to the motor A, B holes in the pcb and used female to male connector to attach it to the breadboard

But before soldering on the PCB, I went and bought a $1 protoboard from Radioshack and practised soldering with some wires till I was comfortable enough.

IMO, DIP plugs and IDC connectors are the easiest. Crimping molexes is next, and finally soldering. Get a helping hand or a vise, it is very useful and never touch the solder to the iron but on the joint.

This is a newbies viewpoint, I'm sure folks here would have better advice! Most of what I did, I learnt from this board and the folks here.

Thanks guys! :)
 

Mycroft2152

Senior Member
Sputz,

Nicely done! Very clean and neat.

My own preference for removng solder in double sided pcbs is to use a solder sucker along with the soldering iron. I never had much luck with the solder braid and I'm concerned about applying too much heat and frying the pcb. Also with the solder sucker you can sorta see when your solder is melted.

Always practive and develop your soldering technique on a "sacrificial" pcb.

Myc
 

hippy

Ex-Staff (retired)
The (usually) red wire is pin 1. On the cable itself they run sequentially 1, 2, 3 etc. On an IDC socket they run side-to-side before up-down, 1-2, 3-4, 5-6, so on a 40-way IDC, pin 1 and pin 40 are diagonally opposite.

On an IDC connector there's usually a triangle pointing away from the cable which show pin 1 and I believe pin 1 is usually on the side the keying is.
 

Mycroft2152

Senior Member
When using ribbon cables how do you know which wire is the one you want?
When in doubt, use a continuity checker or logic probe.

Even a LED/resistor and a battery will work.

I use a small buzzer and a battery, that way I can just listen.

Myc
 

marcos.placona

Senior Member
If you have a multimeter (if you don't, you should), just use the continuity test function, and you'll be able to see which part goes where. Multimeter is here to be your find, and sometimes I find myself amazed by what it can do. I've recently read on elektor that you can actually test if an IC is still working by using the diode check function (yeah, this maybe pretty normal to the more experienced, but is not well documented)

A nice go would be read the multimeter's datasheet (docs), but you won't find everything there, and just experience will bring all you need.

I'm still trying to find out how (what's necessary) to measure temperature with a multimeter, but I'll get there :D
 

Rickharris

Senior Member
When using ribbon cables how do you know which wire is the one you want?

I know this isn't very welcome but the data sheet for the PCB is very clear on how the ribbon cable that came with it are connected. You may need to ponder a while to work out how it relates to your hardware.

I agree about the multimeter they are so cheap now a days.

De-soldering? Well when totally stuck - I heat up the joint with good hot soldering iron and bang the pcb On its edge sharply on the bench - Not approved but often works when all else fails - Then you have to clean up the solder splash but that is often easier.


Actually I don't think your soldering is going to give you problems anyway.
 

marcos.placona

Senior Member
Just as another tip, remember that sometimes putting more solder helps for the removal. So if you have to few solder on the spot you wanna remove, it might actually be really painful to remove it. On the other hand, adding a little bit more of solder will give you a better "grip", and when you try to suck it out, most of the time you end up sucking all of it in one big blob.

IDC sockets are really amazing, and tend to help a lot when tidying up your board, but as any component, it must be treated with care, as you may end up having dead connections with wires going to the wrong way. You can either get a crimp tool for IDC's, or even use a vice (that's what I use) to press it uniformly and get the best of it.
 

MaltiK

Member
Thanks for all the suggestions guys, they were great, I got all the problematic solder out, YAY, now for the connections, what kind of connectors should I use besides IDC and ribbons, they turned out to be real problematic for me, someone before reccommended these:

https://www.roboticsconnection.com/p-31-12-jumper-wires-male-to-female.aspx

https://www.roboticsconnection.com/p-32-12-jumper-wires-female-to-female.aspx

Any suggestions from stores regarding jumpers? Things you guys actually use?
 

Mycroft2152

Senior Member
Check eBay. you can get 100 of various lengths for about $5.

Some vendors will throw in a pakcag4 of 1200 when buying a breadbord.

A much better deal.

Myc
 

Michael 2727

Senior Member
To Hippy,
Get one of those pencil gas torches, ramp the sukker on full bore, heat the
components from the bottom and they come off very easily.
You can get most caps or 2 pin components off within 3 seconds.
Keep the flame moving and close to the PCB.
(do it outside or the wife may kill you, burning PCB stinks )

Even the blocks of USB or Sound/Audio come off in 6 or 7 secs, you get 3 x picaxe
style D/L sockets in one shot free, with the right type of board.
Regulators can be got by lifting one leg at a time (normal iron) then a
big sukker on the tab.

Warning: you can scorch a fingertip or two if you are not paying attention.
Cotton work gloves could help there.

I have a kilo or more of recycled bitz :)

This is the only instance where Rule # 1 does not apply.
 

moxhamj

New Member
My favourite desoldering tool is the third one down on this page: http://www.ceitron.com/solder/desold.html With the rubber bulb and teflon tip.

Mine is 25 years old - the rubber is getting a little cracked but the teflon bit is fine. And it has been heated many many times to 350C.

Sometimes you want to suck the solder. Sometimes you want to blow it through the hole. This simple tool lets you do both.

But looking at the photo - you almost have the holes clear anyway.
 

hippy

Ex-Staff (retired)
@ Michael 2727 : "Nuke it" ... that sounds like a good idea. I'm in two minds now, do I go and retrieve the stuff I dumped in the bin a few days ago and buy a flame thrower or just say good riddance to it. Hmm.
 

Dippy

Moderator
Too late hippy, I've raided your bin.

I really must get around to spending hours unsoldering ha'penny resistors :)
 

Michael 2727

Senior Member
Dick Smith's Electronics have been selling these for 10 years or more, they were AUD $9.95
now they go for around $12.00.
http://www.hobbytools.com.au/prod806.htm
I'm sure they would sell worldwide, china prolly makes 4 million units a day.

I found some Chinese versions in the $2 shop for $3.50 ( yeh I know, I know )
same factory by the looks, but sticky labeling not anodized labeling. Works just as well.

They can clog up/stop, but you simply remove the flame guide and refill them backwards,
blows the crap back into the tank :)
 

Michael 2727

Senior Member
When I use the gas axe approach I'm not interested in saving the M/Board in any way, I just
want the components off as fast as possible and with as little heat damage as possible.

I can get Capacitors, 32KHz watch XTLs, transistors off a motherboard so fast there
is still unmelted solder disks on the top side legs.

Larger components like the Audio Socket section need a lot of heat fast to avoid melting
the plastic parts, Inductors do get hot though being copper and thick, I've even got
Plastic housed header pins off but you need to socket them in a plug or the plastic distorts.
Motherboard Caps are usually very compact, smaller than most people can buy off the shelf,
but are only typ 6.3V to 16V. SMD Chips aren't much chop unless you have special tools.
My Junk bins runneth over :)

Sheesh Dippy, ya don't even bother with resistors @ 10¢ per million off ebay ;)
 

MaltiK

Member
Thanks for the great recommendations, I bidded on the ebay one whoever reccomended that, and I bought the bulb, that seems convenient, from RS, thanks guys!
 

BrendanP

Senior Member
If you haven't much money and want to reycle components a good trick is to put the pcb in a vise or similar and heat the solder side with a heat gun, and just pull the part off the other side with a pair of long nose pliars. I read this in Silicon Chip I think. It does work I've done it on my own proto boards when I've needed to parts in a hurry. You can pull off lot of parts very quickly.

Ive got a makita heat gun with variable settings, Ive seen cheapos at Bunnings for bugger all. Strip paint too. Permanently damage your eye too, watch out where you point it.

Tyco flex strip jumpers are handy. Mouser has them.
 

westaust55

Moderator
My favourite desoldering tool is the third one down on this page: http://www.ceitron.com/solder/desold.html With the rubber bulb and teflon tip.

Mine is 25 years old - the rubber is getting a little cracked but the teflon bit is fine. And it has been heated many many times to 350C.

Sometimes you want to suck the solder. Sometimes you want to blow it through the hole. This simple tool lets you do both.

But looking at the photo - you almost have the holes clear anyway.
Dr_A,
I have a very similar solder sucker which I have had for many years (20, 30 or other).

I still often use desoldering braid when I want to free up several pins in a row.

But at the ends of the day my desoldering is only to remove a component that needs changing (failed, wrong, expensive). I do not try to save 4c each carbon film 1/4 Watt resistors. Probably cost more for power, braid, band-aids, etc than the resistor is worth.
 

Andrew Cowan

Senior Member
I use a heat gun for big PCBs (motherboards from PCs etc), and a heated solder sucker (30W) from maplins for smaller items. You can desolder a 4 digit LED display just using the solder sucker thing. Remove the solder - it falls out.

Andrew
 
Top