RFA030 usage

pkf

Member
Hi, I am looking at the RFA030 and like to confirm the following :
(a) it can be a substitute for the AXE027. If this is the case, the URF module is attached to the PC and the ERF module may be attached to a picaxe microntroller (?)
(b) Is the ERF designed to allow it to attach to a Microbot ?
(c) If not, what is the ERF designed to attach to ?
 

Jeremy Harris

Senior Member
The ERF (if still available, the supplier has just folded - http://www.picaxeforum.co.uk/showthread.php?29204-WirelessThings-(Ciseco)-radio-modules-70-off plus it was an obsolete product before that, so I guess Rev Ed will be just using stock they already have) has solder pads for the two power supply connections (0V and +5V) plus the Tx out and Rx in connections that are soldered to a suitable connector to suit whatever the Picaxe project needs. In your case, the Microbot uses the standard 3.5mm stereo jack connection as a programming port, so you would need to solder up a lead with 0V, serial out and serial in leads from the ERF to a suitable 3.5mm stereo jack plug, plus you would need to also solder supply leads to a suitable power supply (+4.5V should be OK, I think).

So the answer is that you could make up an adapter lead to connect the ERF module to the Microbot, then use the URF module in the programming PV and do away with the AXE026 programming lead. As far as I know there isn't an "off the shelf" way to connect an ERF to the Microbot without soldering up an adapter lead.

The ERF was designed to be a wireless serial connection, that works just like a length of wire carrying serial data both ways. They were very good, I've used a few and they work exceptionally well. The pity is that they were made obsolete a few months ago and now the company that made them seems to have folded, which is a shame.

For non-programming purposes, the Chinese made HC-12 wireless modules are a pretty good replacement, although they operate at 433 MHz, rather than the 868 MHz of the ERF modules. There is a thread here discussing the merits of the HC-11 and HC-12 modules that was inspired by the demise of the ERF modules: http://www.picaxeforum.co.uk/showthread.php?28893-HC-11-and-HC-12-transceiver-modules I suspect that this may be a bit above your current experience level, but you may find it useful if you wish to add a relatively simple wireless serial data link capability to a future project.
 

pkf

Member
Hi,
First of all, thanks for your comprehensive reply.
My thoughts were :
(a) To try out the RFA030. You need to first know a few things, that I was ‘crazy’ enough to
(i) try Picaxe even it is my first experience of it’s kind so you can avoid second guessing my experience.
(ii) buy 3 sets of RFA030 along with some Picaxe items in Mar (I didn’t manage to find time to work on Picaxe till late Jul this year). In other words, I already have the products in front of me.
You have personally tried the RFA030 product before and ‘endorsed’ it, and giving you weightage is a natural extension. Also, it’s not often for someone to tell me a product is good. My stereo jack (once opened up) has 2 stereo terminal flaps (just like the Microbot motor flaps) and 1 ground terminal. Do I should solder 2 stereo terminals instead of 1 ?
I would like to request for a photo of how you connect the ERF to the stereo jack to confirm I am not off track, though you are not obliged to do so.
(b) If we have a good product (taken as good applications), it’s hard to understand why Rev Ed didn’t buy the RFA030 design (not buy out the supplier). Afterall, Ciseco has folded and they have all to gain and nothing to lose by selling the design (intellectual property) isn’t it ? Unless someone has explored this path before and it didn’t work.
I have read some reports of Rev Ed earlier and it is not a surprise that clearing inventory is a top priority for them.
I may not be familiar with the protocol on this forum, and may land up with a moderator/ Rev Ed personnel telling me I have diverged :)
(c) I have read the thread on HC-12. What is the break capability you folks were referring to ?
(d) There was something you mentioned about Chinese in the HC-12 thread though I wasn’t sure what the context was. If I can be of help let me know directly. I am more comfortable with Chinese than English.
 
Last edited:

Jeremy Harris

Senior Member
If you look at page 5 of the RFA30 datasheet (here: 
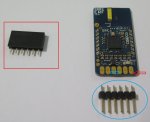
http://www.rev-ed.co.uk/docs/RFA020.pdf ) then there is a wiring diagram that shows how to connect the ERF module to a Picaxe. The same applies to connecting to the Picaxe on the Microbot, but you would need to solder wires to the correct places, and there may well not be provision to do that, so you may need to improvise. I don't have any photos of an ERF wired for programming, as I've only used the ERF as a data link, using 2 ERF modules with a Picaxe at either end, the same way that I'm now using the HC-12 modules.

The special Rev Ed ERF/URF combination was designed to be a way to programme without the need for a serial cable, which can be useful. The key difference between the ERF as supplied by Rev Ed, and the ERF as sold by Ciseco, was that the Rev Ed version has special internal programming that allows it to support the "break" function. The "break" function isn't a command, as such, it is an old RS232 method of signalling a transmission break, and consists of holding the Tx line at a logical 0 for longer than a single byte transmission frame. Normally a byte would be transmitted as a start bit, the data bits, plus a stop bit, and possibly a parity bit and more than one stop bit. The "break" signal just holds the Tx line at a logical 0 for longer than that duration, a duration that varies with baud rate and the specific data transmission format. The HC-12 (or HC-11) modules don't have the capability to do this, they can only transmit "regular" data frames, and cannot hold the Tx line at a logical 0 on command. As far as I know, there aren't any other serial wireless modules that support the "break" function, either.

I'm not sure what went on with Ciseco. They were a small start-up company, developing products for the "Internet of Things", that were bought out, then seems to have folded. I'm guessing they produced a batch of special ERF modules for Rev Ed and that when that stock runs out they will no longer be available. Rev Ed is also a very small company, and is focussed primarily on the educational market, so I doubt they would have been either able, or interested in, buying a company that was specialising in wireless connectivity.

Thanks for the offer of help with the Chinese translations. It is a problem that is commonplace, in that the data sheets for some Chinese-made modules are often poorly translated or almost non-existent. A good example is the HC-12 module, but in that case Robert Rozee has managed to write both a useful programming utility and edit the data sheet into more meaningful English (here: https://github.com/robert-rozee?tab=repositories ). I'm in the process of translating a difficult to understand data sheet for a serial interface relay module, where the Chinese to English translation was not clear. One example that had me fooled for an hour or so was the term "crawl", applied to the logic state of a connection. I eventually found that was was really meant was that the relay would follow the logic state, with a logic 1 being open and logic 0 being closed. Similarly, the normal English term for changing the state of a pin sequentially is to toggle it. In the Chinese translation I had instead of toggle they had used the word "turn", or "turn over".
 
Last edited:

pkf

Member
I will try out the ERF module first.
I have attached a picture to get confirmation if the connections I spell out below are correct :
View attachment 20163
(a) In the stereo jack picture, I solder a wire to the spot in blue oval.
(b) Then I solder a wire to the spot in red box.
ERF module.jpg
(c) Next in the ERF module picture, I solder the header with the shorter pin downwards into the ERF module.
(d) Then I solder the wire in blue oval (from the stereo jack) to the 3rd pin from the right of the ERF Module.
(e) Lastly, I solder the wire in red box (from the stereo jack) to the 1st pin from the right of the ERF Module.

If I do this, I seemed to have left out the left connector in red box in the picture with the ERF module. Did I miss something ?
Do I need to make additional connections with devices like two 10k and one 22k resistors as shown in the ERF Module manual ?

I don't mean Rev Ed buys Ciseco. I mean Rev Ed only buys the ERF design. Just that I don't see why Ciseco management will be unwilling to let go since there's money to be made, whether they fold up or not.
 
Last edited:

Jeremy Harris

Senior Member
The connections could be:

ERF pin 6 (the connection pad to the right in your photo above) wired to the tip of the 3.5mm stereo jack plug (0V)

ERF pin 4 wired to the power supply +ve on the Microbot Picaxe

ERF pin 3 wired to the ring on the 3.5mm stereo jack plug

ERF pin 2 wired to the body on the 3.5mm stereo jack plug

This should work OK, as I've programmed with ordinary 5V logic levels through the on-board protection resistors on the serial input many times with no problems. It doesn't follow the diagram on the data sheet, but should work. You don't need any additional components, just a spare 3.5mm stereo jack plug plus some wire and a way to connect the power supply to pin 4 on the ERF module.

The ERF design includes the high frequency antenna matching elements on the circuit board, that aren't that easy to produce for a company that isn't geared up to deal with high frequency RF systems.
 

pkf

Member
I have attached a diagram below from the earlier descriptions of pins 6 and 3. Please advise if there are misinterpretations on my end.
View attachment 20167
For pin 2, when we say it is wired to body on the 3.5mm stereo jack plug, what we mean is the wiring is not connected to any part on the previous stereo jack diagram I showed right ? My stereo jacks have plastic bodies not metal ones. I originally thought there would be soldering on the internal flaps of the stereo jack and if the solder touches the metal body, then essentially I land up with a ground situation. Do we mean I have to get stereo jacks with metal bodies, then solder pin 2 to the body ?
For pin 4, where is a possible location for power supply +ve on the Microbot Picaxe ? Will any of the connections marked red on the motherboard at the back of the Microbot do ?
I found out a source of my confusion. Though I was aware there was a pinout on the RFA020.pdf page 4 earlier, I noticed that the diagram of the ERF module wasn't the same as what was delivered to me.
The one in the manual was v0.3a while mine was v2.0. The layout of the components did not seem identical.
When the diagram in the manual was seen in exploded view, the 0.3a version had the following pinout order from left to right :
DTR, RX, TX, PWR, CTS and GND. My ERF module had no such labelling. How safe is it to assume that the order of the pinout of the V2.0 module I received to be the same as that of the 0.3a version ?
 

Jeremy Harris

Senior Member
I can't open the attachment for some reason.

The "body" connection on a stereo jack is the length of the jack shaft nearest the cover. When used as a stereo audio connector, this connection is to ground, but for programming a Picaxe this connection goes to serial out. If you look at the wiring diagram on page 5 of the RFA20 data sheet, then the body is labelled "a", the ring is labelled "b" and the tip is labelled "c".

The pin out for your, newer, version of the ERF is in the same order as the older version.

I'm afraid I can't help with getting power from the Microbot, as I've never looked at one. My best guess is that you will need to solder a wire on to the circuit board, or perhaps there may be a spare pin header that you could use. The latter would be simpler, if such a thing is available. Hopefully someone here with knowledge of the Mocrobot might be able to help with this.
 

pkf

Member
I tried re-attaching my picture and it still didn't show up. I understand what you mean now from your reference to page 5.
>>>Thanks<<<. Honestly you have answered a lot of my queries here, and every time I saw your replies, I was delighted.

I have attached an additional diagram on the connections on the back of the Microbot.
3 pins at the back of the microbot.jpg
Can someone help to advise how I can wire the ERF Module to the Microbot ? Are any of the connections in my diagram feasible for me to do this, or I have to look at somewhere else on the Microbot ?
 

Attachments

Jeremy Harris

Senior Member
The jack drawing is right, that should work fine with the body connected to ERF pin 2.

From the photo of the Microbot it looks very much as if the red connections are the positive power supply. Perhaps someone else can confirm, but it looks as if the centre pin of the three pin header is the +ve power connection. If it is, then that makes it easier to connect the ERF, as you can solder the centre wire on a three way socket to ERF pin 4 and just plug it in to the Microbot header to get power.
 

Technical

Technical Support
Staff member
On the microbot itself it is

0V signal V+

However the 3 pin header is designed for a servo so becomes

0V V+ signal

In both cases there is red/black colouring for V+/0V respectively.
 

pkf

Member
Please help me to confirm. Our orientation of 0V V+ signal (left to right) is the order when the positions are viewed from the back of the Microbot right ?

So it looks as like if I want to 'give up' having a servo in the current position the header and pins were assembled, then connect to the centre servo position with V+ ?, or it's simply not possible/ recommended for me use the pins soldered on the servo board for this purpose ?

What if I choose to attach the wire to somewhere nearer the C.0 position ? If I need a V+ position as recommended earlier, would it be correct for me to use the position with a red circle on the far right at the back of the Microbot ?
 

Technical

Technical Support
Staff member
Simply look at the colours, they are very clear on whatever connector/pcb you are using. Red=V+, black = 0V, gold =signal.

You can use the servo header for all 3 connections that you need.
 
Top