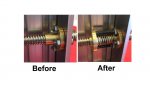
Hi Rick, I couldn't get my photo to upload on the last message. This time, it seems to have uploaded just fine???Do your parts look like this?
This is what I got in the box:
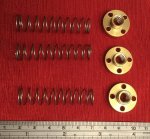
The extra nuts are similar to the supplied drive nuts, just with a shorter threaded section...
I'm certain you're not alone in that thoughtI'm just afraid I'll run out before I go.")
I'll have to have another look...I've added homing to my machine on the X and Y axis. It's a little more elaborate than a simple switch though. The schematic is at the 5:18 mark in the video.
Still reading the wiki, over a coffee or two - lots of infoThe Arduino Uno has a limited number of pins so instead of a home and two end limit switches for each axis, it uses one pin and two switches. The switches are wired in parallel. I tried soft limits but I got into some funky state where I couldn't jog the machine so I turned them off. I wouldn't worry about home and limit switches yet....
Good thing for a beginner!The motors don't have enough power to do serious damage
Not sure what you mean. I hooked up the supplied relay board to control the spindle motor and connected it's 'IN' pin to the shields 'SpnEn' pin and I can start stop the motor with 'M3' and 'M5' commands through GRBL...Keep in mind GRBL v9 has the Z-limit and the spindle enable pin swapped.
Once I get the wiring all soldered, heatshrunk and loomed - nice and neat - that's next on my list. Download and play with Flatcam.When you get into using the Flatcam program to produce your g-code, you will be able to specify your feed rate.
Thanks for all your assistance, I appreciate it!
Regards, John.