4-20mA project
- Thread starter dan123456
- Start date
Perhaps post a photo of your board with pot and LED connected. There shouldn't be any reason it doesn't work if wired correctly.
You could try the following to check that the LED can be controlled -
If that doesn't toggle the LED on and off every second then possibly the LED is faulty, connected to the wrong pin, or wired backwards.
You could try the following to check that the LED can be controlled -
Code:
Do
  High B.1 : Pause 1000
  Low  B.1 : Pause 1000
Loop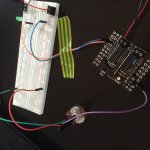
Thanks! thats worked
For some reason when i use the code below when just the output B3 is meant to be on and the rest of them off, B2 is also on
For some reason when i use the code below when just the output B3 is meant to be on and the rest of them off, B2 is also on
Code:
 Do
  ReadAdc C.2, b0
  If b0 > 102  Then
    High B.2
    low B.1
    low B.3
    Else
    low B.2
  End If

	readadc C.2, b0
	if b0 > 230 then
	high B.3
	low b.1
	low b.2

else
	Low B.3
endif

	readadc C.2, b0
	if b0 <102 then
	high B.1
	low B.2
	low B.3
else
	low B.1
endif
loop
endQuite possibly, or it may at least look that way.For some reason when i use the code below when just the output B3 is meant to be on and the rest of them off, B2 is also on
You set and clear LED's multiple times so B.2 is turned on because the ADC is greater than 102, and then B.2 is turned off because ADC is greater than 230. The pulsing of B.2 probably makes it seem like it's on all the time.
Similarly, when ADC is greater than 102, B.3 is turned off, then turned on because ADC is greater than 230. It's pulsing similarly as B.2 does which means they will probably appear to have the same brightness, both turned on when neither are continually turned on at all.
The solution is to restructure your code so only one IF clause is ever executed in the loop which turns on the LED you want on and turns off the others. You also only need to do one READADC at the start of the loop, and you can remove the explicit check for less than 102, which probably should be less than or equal to 102 -
Code:
Do
  ReadAdc C.2, b0
  If b0 > 102 Then
     If b0 > 230 Then
      :
    Else
      :
    End If
  Else ; b0 <= 102
    :
  End If
Loop
Code:
Do
  ReadAdc C.2, b0
  If b0 > 230 Then
    :
  Else
    If b0 > 102 Then
      :
    Else ; b0 <= 102
      :
    End If
  End If
Loop
Code:
Do
  ReadAdc C.2, b0
  If b0 > 230 Then
    :
  ElseIf b0 > 102 Then
    :
  Else
    :
  End If
Loop
Code:
Do
  ReadAdc C.2, b0
  Select Case b0
    Case > 230
      :
    Case > 102
      :
    Else
      :
  End Select
Loop
Code:
Do
  ReadAdc C.2, b0
  Select Case b0
    Case > 230
      Low  B.1 : Low  B.2 : High B.3
    Case > 102
      Low  B.1 : High B.2 : Low  B.3
    Else
      High B.1 : Low  B.2 : Low  B.3
  End Select
Loop
Code:
Do
  ReadAdc C.2, b0
  Select Case b0
    Case > 230 : Low  B.1 : Low  B.2 : High B.3
    Case > 102 : Low  B.1 : High B.2 : Low  B.3
    Else       : High B.1 : Low  B.2 : Low  B.3
  End Select
LoopWelcome to "phantom powering", where all sorts of weird and wonderful things can happen. The PICAXE is probably being powered by a voltage through the pot or perhaps the download cable.I've just realised that even when I disconnect the power from my project board, 2 of the LED's will still light up and when I move the potentiometer, they dim and brighten accordingly. I'm guessing this is the problem but I can't understand why it's happening
I wouldn't worry about it particularly and it's not likely the cause of the issue with your program - see above.
That works perfectly Hippy! thanks very much
I'm planning to use 10 LED's in total, So I just added one more LED using the same concept to see if I could get it to work but it didn't.
I'm planning to use 10 LED's in total, So I just added one more LED using the same concept to see if I could get it to work but it didn't.
Code:
 Do
  ReadAdc C.2, b0
  Select Case b0
    Case > 230 : Low  B.1 : Low  B.2 : High B.3 : Low  B.4
    Case > 102 : Low  B.1 : High B.2 : Low  B.3 : Low  B.4
    Case > 204 : Low  B.1 : Low  B.2 : Low  B.3 : High B.4
    Else       : High B.1 : Low  B.2 : Low  B.3 : Low  B.4
  End Select
Loop
Last edited:
That's because the > 102 condition will be met before the > 204 case is ever reached. You need the > 204 after > 230 but before > 102.I just added one more LED using the same concept to see if I could get it to work but it didn't.
Hi Guys, almost there now!
I've got two pieces of code, one for my OLED screen and the other for my LED's. At the moment they are in two different documents but I need them to be in the same one so that I can program the 18M2 chip, I was wondering how I'd go about merging the two?
I've got two pieces of code, one for my OLED screen and the other for my LED's. At the moment they are in two different documents but I need them to be in the same one so that I can program the 18M2 chip, I was wondering how I'd go about merging the two?
Code:
 low b.7 ; Initialise OLED output
pause 500 ; Waif for OLED to initialise
Serout B.7,N2400_4,(254,1)   '// Clear Display
Pause 10
serout b.7, n2400, ( 254, $82 ) ; First line of display
serout b.7, n2400, ("Temperature:") ; Display "Temperature"

main: readadc10 C.2, W0
      w0 = w0 * 44 / 45
      bintoAscii w0,b5,b5,b6,b7,b8 ; Convert temperature to ascii digits
      serout b.7, n2400, ( 254, 197 ) ; Line 1, Position 6
      serout b.7, n2400, (B5,B6,B7)
      serout b.7, n2400, (".")
      serout B.7, n2400, (b8)
      Serout B.7, n2400, ("    ")
	serout b.7, n2400, ("C")
      pause 1000 ; Wait a second

goto main
Code:
 do
  ReadAdc C.2, b0
  Select Case b0
Case > 230 : High B.7 : Low  B.6 : Low  B.5 : Low  B.4 : Low  B.3 : Low  B.3 : Low  B.2 : Low  B.1 : Low  C.7 : Low  C.6
Case > 204 : Low  B.7 : High B.6 : Low  B.5 : Low  B.4 : Low  B.3 : Low  B.3 : Low  B.2 : Low  B.1 : Low  C.7 : Low  C.6
Case > 179 : Low  B.7 : Low  B.6 : High B.5 : Low  B.4 : Low  B.3 : Low  B.3 : Low  B.2 : Low  B.1 : Low  C.7 : Low  C.6
Case > 153 : Low  B.7 : Low  B.6 : Low  B.5 : High B.4 : Low  B.3 : Low  B.3 : Low  B.2 : Low  B.1 : Low  C.7 : Low  C.6
Case > 128 : Low  B.7 : Low  B.6 : Low  B.5 : Low  B.4 : High B.3 : Low  B.3 : Low  B.2 : Low  B.1 : Low  C.7 : Low  C.6
Case > 102 : Low  B.7 : Low  B.6 : Low  B.5 : Low  B.4 : Low  B.3 : High B.3 : Low  B.2 : Low  B.1 : Low  C.7 : Low  C.6
Case > 77  : Low  B.7 : Low  B.6 : Low  B.5 : Low  B.4 : Low  B.3 : Low  B.3 : High B.2 : Low  B.1 : Low  C.7 : Low  C.6
Case > 51  : Low  B.7 : Low  B.6 : Low  B.5 : Low  B.4 : Low  B.3 : Low  B.3 : Low  B.2 : High B.1 : Low  C.7 : Low  C.6
Case > 26  : Low  B.7 : Low  B.6 : Low  B.5 : Low  B.4 : Low  B.3 : Low  B.3 : Low  B.2 : Low  B.1 : Low  C.7 : High C.6
Else       : Low  B.7 : Low  B.6 : Low  B.5 : Low  B.4 : Low  B.3 : Low  B.3 : Low  B.2 : Low  B.1 : High C.7 : Low  C.6

 End select
Loop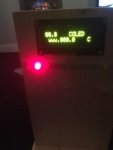
Hi again
After properly Testing the merged code, not all the LED's come on when they should (most of them do) and the screen works perfectly. However, when I tested the LED code by it self it worked fine and the same with the screen. It was only when I merged the two that I am getting problems, any ideas?
After properly Testing the merged code, not all the LED's come on when they should (most of them do) and the screen works perfectly. However, when I tested the LED code by it self it worked fine and the same with the screen. It was only when I merged the two that I am getting problems, any ideas?
Post your combined code and people can check to see if there's any issue. You could try running the previously tested LED only code and see if that still behaves the same as it did.any ideas?
inglewoodpete
Senior Member
Simplify!
Since only one LED is turned on in every case, why not turn them all off in one statement and then selectively turn on just the one you want? Refer to the revised code, below:
The code that you posted in #51 is unnecessarily complicated and you appear to have confused yourself, too - output B.3 is duplicated and, in some cases, getting turned on and off in the same Case branch.After properly Testing the merged code, not all the LED's come on when they should (most of them do) and the screen works perfectly. However, when I tested the LED code by it self it worked fine and the same with the screen. It was only when I merged the two that I am getting problems, any ideas?
Since only one LED is turned on in every case, why not turn them all off in one statement and then selectively turn on just the one you want? Refer to the revised code, below:
Code:
[color=Blue]Do
  ReadAdc C.2[/color][color=Black], [/color][color=Purple]b0
  [/color][color=Blue]Low B.7[/color][color=Black], [/color][color=Blue]B.6[/color][color=Black], [/color][color=Blue]B.5[/color][color=Black], [/color][color=Blue]B.4[/color][color=Black], [/color][color=Blue]B.3[/color][color=Black], [/color][color=Blue]B.2[/color][color=Black], [/color][color=Blue]B.1[/color][color=Black], [/color][color=Blue]C.7[/color][color=Black], [/color][color=Blue]C.6
  Select Case [/color][color=Purple]b0
   [/color][color=Blue]Case [/color][color=DarkCyan]> [/color][color=Navy]230
      [/color][color=Blue]High B.7
   Case [/color][color=DarkCyan]> [/color][color=Navy]204
      [/color][color=Blue]High B.6
   Case [/color][color=DarkCyan]> [/color][color=Navy]179
      [/color][color=Blue]High B.5
   Case [/color][color=DarkCyan]> [/color][color=Navy]153
      [/color][color=Blue]High B.4
   Case [/color][color=DarkCyan]> [/color][color=Navy]128
      [/color][color=Blue]High B.3    [/color][color=Green]'??
   [/color][color=Blue]Case [/color][color=DarkCyan]> [/color][color=Navy]102
      [/color][color=Blue]High B.3    [/color][color=Green]'??
   [/color][color=Blue]Case [/color][color=DarkCyan]> [/color][color=Navy]77
      [/color][color=Blue]High B.2
   Case [/color][color=DarkCyan]> [/color][color=Navy]51
      [/color][color=Blue]High B.1
   Case [/color][color=DarkCyan]> [/color][color=Navy]26
      [/color][color=Blue]High C.6
   Else
      High C.7
   End select
Loop[/color]