Help with HY SRF05 ultrasonic distance sensor

Gaetano

New Member
Hello All

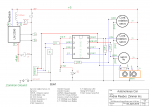
I was given a 5 pin HY-SRF05 Ultrasonic Distance Sensor Module for Arduino. I am trying to use it with a 14M2 chip. I have looked through the threads in the forum and also at lets make robots with no luck at this point. The pins are in this order VCC, TRIG, ECHO, OUT, GND. I have also looked at the information presented on
http://www.robot-electronics.co.uk/htm/srf05tech.htm that talks about the upgrade from the SRF04 to SRF05, still nothing. Has anyone used these successfully with a picaxe? i would be grateful for any advice as to get working.
Thank you
Gaetano
 

hippy

Technical Support
Staff member
Preliminary testing with a HY-SRF05 suggests it can work with the PICAXE though the results do not appear to be as stable or as consistent as a 'genuine' SRF05 ( our part code SRF005 ). We have not analysed why that may be.

The information on the link given refers to the 'genuine' SRF05 so is not applicable to the HY-SRF05 or other clones.

What are the exact problems are you experiencing with the module you have ?

How is your circuit wired, what code are you using, and what results do you get ?
 

erco

Senior Member
Gaetano: Those sensors are dirt cheap: http://www.ebay.com/itm/1Pcs-New-5pin-HY-SRF05-Ultrasonic-Distance-Sensor-Module-for-Arduino-Best-/181561947424?pt=LH_DefaultDomain_0&hash=item2a45ef7520 and

http://www.ebay.com/itm/New-Ultrasonic-Module-HC-SR04-Distance-Sensor-Measuring-Transducer-for-Arduino-/161725595602?pt=LH_DefaultDomain_0&hash=item25a798bfd2

I have used both the HC-SR04 and -05, both work OK. I have heard generally that the 05's extra output pin gives a simple high/low output for proximity detection but I haven't seen that for myself. I just ignore it and use the Trig/Echo pins.

Per hippy, it is very different from a genuine SRF05. See http://www.f15ijp.com/2012/09/arduino-ultrasonic-sensor-hc-sr04-or-hy-srf05/

I have modified many -04s for one pin mode, can't recall if I've tested an -05 specifically but it's easy enough to try just by adding a 1.8K resistor. See http://www.picaxeforum.co.uk/showthread.php?22639-HC-SR04

Edit: I did test one-pin mode on an -05 sensor and it worked: http://www.picaxeforum.co.uk/showthread.php?22639-HC-SR04&p=224140&viewfull=1#post224140
 
Last edited:

eggdweather

Senior Member
I've used the cheap SR04 and 05 modules and repeatedly got mm (millimetre) accuracy and results consistent across devices too, I have been really surprised how good they are. The maximum reliable range I have got is ~1.2Metres
 

erco

Senior Member
I wasted nearly an hour searching for info on the OUT pin on the HY-SRF05. Nothing conclusive. Apparently it's a mode pin on the original SRF05, selecting one or two pin mode. Not much in the way of a data sheet, but I found this "tech spec":

• Use method: • Supply module with 5V, the output will be 5V while obstacle in range, or 0V if not. The out pin of this module is used as a switching output when anti-theft module, and without the feet when ranging modules.

Whatever that means. Someone will be an internet hero if they can sort out what that pin does.
 

Gaetano

New Member
Hello erco, eggdweather and hippy (no particular order).
I really appreciate your time an input. I have tried all sorts of options including those in the srf005 document, all with frustrating results. All I wanted to do was debug it to see if it worked. I will take this module to the bin and buy a HC-SR04. My brain can't figure this one out. Again thank you for your input.
Regards
Gaetano
 

techElder

Well-known member
Active HIGH: Sounds like an "approach" alarm output. ... Don't get in my space!

Active LOW: Sounds like a "removed" alarm output. ... I'm gone! Stop thief!


• Use method: • Supply module with 5V, the output will be 5V while obstacle in range, or 0V if not. The out pin of this module is used as a switching output when anti-theft module, and without the feet when ranging modules.


Your welcome. Send my prize to BR549, Hometown, USA.
 

hippy

Technical Support
Staff member
I would guess the "anti-theft mode" is similar to how ultrasonic units are used in a vehicle which can activate when a window breaks or the door is opened.

In that mode the unit would likely be self contained, need no micro or electronics other than to handle the activated (OUT) signal. With normal mode being pulse activated, I would have expected the anti-theft mode to be entered if the trigger were tied high or not connected for some period, or when turned on, or perhaps when echo or OUT tied to trigger.

Nothing I did seemed to select anything which seemed to be an anti-theft mode, but perhaps not all XX-SRF05 modules support that ?
 

rberkelm

New Member
Just to be clear, the HY variant of the SRF05 does work with Picaxe - no need to throw these units out! I managed to make it work with an 08m2 at 8Mhz and using two i/o pins (for Trigger and Echo). I haven't played with the Mode pin. The readings look ok to me, but can't comment on how stable they are compared to the 'genuine' version. Precision looks to be around 5-7mm at 1m distance. I've also tried to see if I could make it work using a 2k2 resistor between the trigger and echo pin and using only one i/o pin on the 08m2 as suggested elsewhere on the forum, but no luck.
Code:
#picaxe 08m2              
;HY SRF05 Ultrasonic sensor
Main:
setfreq m8        'Set freq to 8Mhz
pause 100         'settling time
do
pulsout C.1,1        'Trigger pin of SRF05 connected to C.1
pulsin C.3,1,W0    'Echo pin of SRF05 connected to C.3
w1=w0*8/10        'conversion of raw readings to mm using
w2=w0*6/100      'y=0.86x which seems to work for my unit
w3=w1+w2
pause 500
debug
loop
 

Gaetano

New Member
Hello rberklem
Just saw your post, I had given up this module. I have an old 8M and tried exactly what you suggested. I received a lot of feedback from the debug, but I really had no idea of what I was observing. I then thought I could translate this to the 14M2 I used originally, but I got no response at all. If you don't mind could you upload a picture of the wiring setup you used for the HY-SRF05, thank you.
Gaetano
 

Andrei IRL

Senior Member
Here is the way I used this sensor a couple of weeks ago in my bot car. Its working well. I modified it for the use of single pin to transmit and receive the signal.
Circuit_Diagram.png
I used ULTRA command with it too.
ULTRA
Hope it helps.
Andrei.

 
Last edited:

erco

Senior Member
Gaetano: I'm answering your PM question here, perhaps it may assist someone else with the same problem. I just tested 19 HY-SRF05 modules I have had for a year or more (hoarder that I am). One bad unit (just zeroes out) so I trashed it. SRF04 units are under a dollar now, not worth troubleshooting: http://www.ebay.com/itm/221849272728 BTW I got some from that seller for 75 cents last week, but he just raised his price!

They work fine in two pin or one pin mode, same as SRF-04 types, but of course the pinout is different, the ground connection is moved over one pin to make room for the mysterious OUT pin, which I left floating. Per another very helpful thread, use a 1K8 resistor (I used 2K2 today, worked fine) between TRIG and ECHO for one-pin mode, and run one wire to TRIG. Works fine with the ULTRA command.

Code:
do			' start  loop
ultra 4,b4		' read ultrasonic sensor on pin 4, save cm distance as b0
sertxd (#b4,13,10)	' display b0 value in serial monitor
pause 200		' wait 200 ms
loop			' end do loop
 
Last edited:

Gaetano

New Member
Hello Andrei
Thank you for your post, it helps me a great deal. I looked at your schematic and will use the 2k2. The main difference (big difference) is that I connected the Trig to the picaxe, where I noted that you connected the Echo. I am supplying only 4.5volts because the 14M2 will be damaged with a higher voltage; is the extra 0.5volts critical to the successful operation of the circuit? I ask these questions because electronics is not my background and I figure if you don't know - ask for help. Your video is brilliant, again thanks
Regards Gaetano
 

Andrei IRL

Senior Member
Hello Andrei
Thank you for your post, it helps me a great deal. I looked at your schematic and will use the 2k2. The main difference (big difference) is that I connected the Trig to the picaxe, where I noted that you connected the Echo. I am supplying only 4.5volts because the 14M2 will be damaged with a higher voltage; is the extra 0.5volts critical to the successful operation of the circuit? I ask these questions because electronics is not my background and I figure if you don't know - ask for help. Your video is brilliant, again thanks
Regards Gaetano
Hi. As part of testing the ultrasonic sensor I was debugging the reading onto the screen of the computer while the serial cable is still connected to the picaxe. I'll put up the code I used for debuging later today. Then you can see exactly what your sensor is sending to picaxe.
 

hippy

Technical Support
Staff member
I am supplying only 4.5volts because the 14M2 will be damaged with a higher voltage; is the extra 0.5volts critical to the successful operation of the circuit?
From the HY-SRF05 datasheets I have looked at it appears to be a 5V module and I recall there were issues with using less than 5V with other ultrasound modules.

The 14M2 can operate from a 5V supply.
 

Gaetano

New Member
Hello erco
Thank you for taking the time to reply, I used your code in conjunction with the other information from the other thread. I included a debug line in your code and could see that the sensor was reading something. I put it against a ruler for a check, but irrespective of where I placed the barrier I kept getting a reading of 200. I am happy that something is happening, so I will keep working on it, thank you.
Regards Gaetano
 

Gaetano

New Member
Hi hippy
took the plunge and powered it separately with 6volts, module is reading. Still have to work out what the debug is telling me
Gaetano
 

erco

Senior Member
BTW all my tests were at 4.7V, 3x new AA cells. Again, 18 sensors worked fine. Make sure your batteries are new and retest. These sensors have a brief current spike when the output pulse is generated and need good batteries to avoid resetting
 

Andrei IRL

Senior Member
From the HY-SRF05 datasheets I have looked at it appears to be a 5V module and I recall there were issues with using less than 5V with other ultrasound modules.

The 14M2 can operate from a 5V supply.
That's great to know.
So the OP can use 5V power supply now knowing that everything is getting enough power.
By the way, here is the code for testing the ultrasonic sensor with the terminal windows displaying the result in centimetres.
Code:
symbol sonar=c.1
pause 1000
main: 
ultra sonar, b1 ; measure the distance 
 sertxd("The value of b1 is ",#b1,13,10)
#terminal 4800
pause 100

goto main
 

Gaetano

New Member
Ok, why do I want to learn how to do electronics? Fresh batteries for 14M2 tested and they are reading 4.78volts. Will try again
 

erco

Senior Member
Last edited:

Gaetano

New Member
Hi erco
Thanks for the pep talk, I wont give up. Already bought the HC-SR04's and have located the DVM you recommended. Looking forward to the fun.
 

slimplynth

Senior Member
Code:
#picaxe 08m2              
;HY SRF05 Ultrasonic sensor
Main:
setfreq m8        'Set freq to 8Mhz
pause 100         'settling time
do
pulsout C.1,1        'Trigger pin of SRF05 connected to C.1
pulsin C.3,1,W0    'Echo pin of SRF05 connected to C.3
w1=w0*8/10        'conversion of raw readings to mm using
w2=w0*6/100      'y=0.86x which seems to work for my unit
w3=w1+w2
pause 500
debug
loop
Cheers rberkelm, just what I was looking for - this worked great for the srf06 modules I bought:

http://www.ebay.co.uk/itm/SRF-06-Ultrasonic-Sensor-Module-Temperature-Compensation-/301472865273

Using a laser range finder to confirm, i'm getting about a 5mm difference at 1800mm... good enough for me.

using an old/battered AXE033 with 18M2...

Code:
symbol trig = c.7 ; Define output pin for Trigger pulse (M2, X2 parts)
symbol echo = c.6 ; Define input pin for Echo pulse (M2, X2 parts)
symbol range = w3 ; 16 bit word variable for range
setfreq m8

init: pause 500 ;wait for display to initialise
hi2csetup i2cmaster,$C6,i2cslow,i2cbyte

main:
hi2cout 0,(254,128,255)
pulsout trig,1 'Trigger pin of SRF05 connected to C.1
pulsin echo,1,w0 'Echo pin of SRF05 connected to C.3
w1=w0*8/10 'conversion of raw readings to mm using
w2=w0*6/100 'y=0.86x which seems to work for my unit
w3=w1+w2
pause 500
 bintoascii range,b8,b9,b10,b11,b12
 hi2cout 0,("Distance=",b8,b9,b10,b11,b12,"mm",255)
 pause 5000
 goto main
 
Top