#picaxe 18m2

;output 7 - FET to drive solenoid bolt
;output 6 - piezo sounder
;output 4,5 - bicolour LED
;output 3 - row 4
;output 2 - row 3
;output 1 - row 2
;output 0 - row 1

;input 0 - column 1
;input 1 - column 2
;input 2 - column 3

symbol key_pos = b0    ; number of keys pressed
symbol key_value = b1    ; value of key pressed

; *** reset position to zero ***

init:
    let dirsB = 255
    let key_pos = 0

; *** now scan each row in turn ***
; *** by setting only 1 row (and LED) high ***
; *** if a switch is hit jump call score sub below ***


;*********************lock close,enter code to open ***************
scan:
    let key_value = 0
    let pinsB = %00010001
    gosub key_test

    let key_value = 3
    let pinsB = %00010010
    gosub key_test

    let key_value = 6
    let pinsB = %00010100
    gosub key_test

    let key_value = 9
    let pinsB = %00011000
    gosub key_test

    goto scan

; *** Score sub procedure. ***
; *** return straight away if no key pressed ***

key_test:
    if pinC.0 = 1 then add1
    if pinC.1 = 1 then add2
    if pinC.2 = 1 then add3
    return

; *** key value will already be 0, 3, 6, or 9 ***
; *** so add 1, 2 or 3 to this value ***

add3:    let key_value = key_value + 1
add2:    let key_value = key_value + 1
add1:    let key_value = key_value + 1

; *** Make a beep ***

    sound B.6,(60,50)

; *** Now increase position counter by 1 ***
; *** and test for 1st, 2nd 3rd or 4th push ***

    let key_pos = key_pos + 1

    if key_pos = 1 then test1
    if key_pos = 2 then test2
    if key_pos = 3 then test3
     if key_pos = 4 then test4

; *** Now test the value for each position individually ***
; *** If value is wrong restart, if correct loop until ***
; *** fourth go. If fourth is correct open lock! ***

; *** Key code is set to 9-3-5-1 ***

test4:
    if key_value = 1 then open
    goto reset1

test3:
    if key_value = 5 then continue
    goto reset1

test2:
    if key_value = 3 then continue
    goto reset1

test1:
    if key_value = 9 then continue
    goto reset1

; *** Got here so open lock and set LED green  ***

open:    let pinsB = %10100000
    'wait 5
    goto init2

; *** Not correct value so reset position counter then return ***

reset1:
    let key_pos = 0

; *** Okay so continue by returning back to main loop ***

continue:
    return


'****************** lock open, enter code to close***********
init2:

    let key_pos = 0

; *** now scan each row in turn ***
; *** by setting only 1 row (and LED) high ***
; *** if a switch is hit jump call score sub below ***

scan2:
    let key_value = 0
    let pinsB = %10100001
    gosub key_test2

    let key_value = 3
    let pinsB = %10100010
    gosub key_test2

    let key_value = 6
    let pinsB = %10100100
    gosub key_test2

    let key_value = 9
    let pinsB = %10101000
    gosub key_test2

    goto scan2

; *** Score sub procedure. ***
; *** return straight away if no key pressed ***

key_test2:
    if pinC.0 = 1 then add12
    if pinC.1 = 1 then add22
    if pinC.2 = 1 then add32
    return

; *** key value will already be 0, 3, 6, or 9 ***
; *** so add 1, 2 or 3 to this value ***

add32:    let key_value = key_value + 1
add22:    let key_value = key_value + 1
add12:    let key_value = key_value + 1

; *** Make a beep ***

    sound B.6,(60,50)

; *** Now increase position counter by 1 ***
; *** and test for 1st, 2nd 3rd or 4th push ***

    let key_pos = key_pos + 1

    if key_pos = 1 then test12
    if key_pos = 2 then test22
    if key_pos = 3 then test32
     if key_pos = 4 then test42

; *** Now test the value for each position individually ***
; *** If value is wrong restart, if correct loop until ***
; *** fourth go. If fourth is correct close lock! ***

; *** Key code is set to 9-3-5-1 ***

test42:
    if key_value = 1 then close2
    goto reset12

test32:
    if key_value = 5 then continue2
    goto reset12

test22:
    if key_value = 3 then continue2
    goto reset12

test12:
    if key_value = 9 then continue2
    goto reset12

; *** Got here so open lock and set LED red ***

close2:    let pinsB = %00010000
    'wait 5
    goto init

; *** Not correct value so reset position counter then return ***

reset12:
    let key_pos = 0

; *** Okay so continue by returning back to main loop ***

continue2:
    return
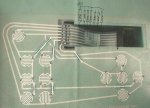
 It is still the same controller that I'm slowly working through getting each bit to work from a picaxe, I've had to do a bit of re-mapping on the pins due to differences on the chip but it's starting to make sense now, never used a keypad before.