i2c lockups in 28x1

inglewoodpete

Senior Member
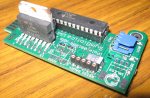
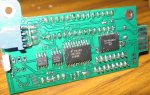
I am (voluntarily) working on a project which is to network over 60 PICAXEs using i2c. The network has an master 28x1 controlling up to 60 28x1s via i2c. The slaves use hardware i2c (hi2c) to control the positioning of a 12v dc motor controlled through a L298 H-bridge (dual 2 amp).

The project is not for monetary gain: it is partially funded by a government grant.

The slaves are about 1 metre apart and have a 12 volt feed for power (on-board 5v regs) and low impedance i2c bus using P82B715 i2c bus extender chips. The bus uses 470 ohm pull-up termination resistors at either end. Each slave borad has the standard 4.7k ohm pull ups on the i2c leads between the P82B715 and the 28x1.

The i2c works reliably until 1 or more motors are run. The motors each pull between 1 and 1.5 amps. Due to the positioning required for the motors, pulsing and PWM are used to drive them.

Once a motor is run, its 28x1 controller's i2c locks up. Note that the 28x1 DOES NOT restart: it continues to run (and continues to send debug data to the PC). The i2c simply stops working. A hard reset (power cycle or reset switch) is required to restore the i2c. Note that a fresh download DOES NOT restore the i2c, although the freshly downloaded code runs normally otherwise. This suggests that nasties are getting into the i2c hardware of the 28x1 and locking it up.

I suspect that the motor current in the supply leads is upsetting the i2c signalling bus. Obviously, the i2c bus is unbalanced and there is up to 1.5 amps pulsing through the earth return, possibly causing the upsets.

Has anyone had similar problems? Better still, does anyone have a possible solution? How should high currents be used in conjunction with i2c?

-Peter
 

hippy

Technical Support
Staff member
Note sure I can help with the electrical side of things but a couple of questions for which the answers may help others ...

Just to clarify : The PICAXE which locks up is the ( remote from master ) motor controlling PICAXE, correct ?

Does a single motor starting lock out just its controlling PICAXE or other motor controlling PICAXE's as well, maybe even the master PICAXE / I2C Buffer ?

That is; can the master still communicate with other slaves, or does all I2C comms die ? What if the running motor is subsequently disconnected ( even though that controller PICAXE may have gone to sleepy-bye land ) ?
 

InvaderZim

Senior Member
That's a nasty noise problem you've got. There is a ton of things you can try; it'll probably take a combination of some of the following, plus whatever others can think of:

-Add 5V zener diodes to the SCL and SDA lines close to the Pic; these will protect against over/under voltages caused by noise (these spikes are likely what is actually locking up the I2C circuits, as opposed to just making it read garbage). With spikes nasty enough to lock up the i2c, you are lucky it isn't damaged.

I'd try the zeners no matter what; then (in addition) try these in whatever order makes the most sense for you (keep adding things until it works):

-Add ferrite beads to the ground and 12V power wires going to each board; I'm not a bead expert, but I think you'd want a bead for each wire, and wrap each one ~2-5 times through the bead if possible. This will help keep high frequency noise off of the power wires, which in turn keeps down 1) conducted noise from one module to another, and 2) radiated noise from these wires to other wires (like your i2c).

-Add capacitance to the motor driver power supply, as close to the motor driver chip as possible; use both large value "bulk" capacitors and very small 0.1 or 0.01uF caps, as they both have strengths and weaknesses.

-On the motor driver chip, ensure that neither the 12V traces nor the ground return traces get near the pic. Also, make sure that the pic ground return does not co-mingle with the motor ground return; they should be physically separate to a point near the main board connection. In addition, there should be a bulk capacitor and very small capacitors at the point where they meet. This will greatly help keep the surging currents from the motor from affecting the pic (both conducted noise and to some extent radiated noise).

-Add 2 "signal ground" wires that tap into ground at (or near) the pic's ground pin (on each end of the data run); run each wire physically next to the SDA/SCL lines. Best yet, use CAT5 (or other twisted pair) wire, with a color on the ground and the color w/stripe on the signal wire; do NOT mix colors, or double up on the wires! The twists will provide some immunity from radiated emmissions, both from the noisy power wires and from other sources in the room.

-Same as above, but add a "common mode choke" at the point where the signal ground and signal wires come onto the board. The theory here is that whatever noise the signal picked up, the ground will also have picked up since it traveled in nearly precisely the same physical path. The common mode choke will "choke" (as in kill) the noise, leaving you with roughly what you started with (hopefully meaningful data). It does this without affecting the signal. Many inductors now are made with 4 pins, so that they can be wired either as one big inductor, a transformer, or as two inductors in a "choke" configuration. Make sure you wire it right, or it'll make things far worse!

-Add a 10 ohm resistor in series with each of the SDA/SCL wires right next to the pic inputs

Also:
The bus uses 470 ohm pull-up termination resistors at either end. Each slave borad has the standard 4.7k ohm pull ups on the i2c leads between the P82B715 and the 28x1.
This sounds wrong to me; I think you need 4.7k ohm pull ups on both SDA/SCL at the master. Do not put any other pull ups or terminations on the bus. Perhaps others can comment on where to put the pull ups.

Good luck! Also, if you don't need the speed of I2C and can't get it to work, consider using RS-422 (or 485); it's just like RS-232, except you get a converter to run it at different voltages and on twisted pair wire, AND you can have 1 master/many slaves on a bus with the right protocol. That makes for reliable communication on a network over 1000 ft. long, just using standard picaxe commands!
 

BCJKiwi

Senior Member
The bus uses 470 ohm pull-up termination resistors at either end
There should only be a single pullup resistor on scl and a single pullup resistor on sda of each separate bus, not one at each end.
 

InvaderZim

Senior Member
Ya know, the pullups could be the only problem here; I sure hope so. Fix those and see how she runs. But with that many motors on a common bus, you're going to scale up any noise problems really fast. Again, good luck!
 

BeanieBots

Moderator
The advice from InvaderZim is very good for coping with noise once it's in your circuit, but it is better to prevent it in the first place.

Think out your 0v power and 0v signals carefully. Do not allow high currents to pass down 0v cables which are used as signal references.
On the motors, place a cap between the motor terminals as close as possible to the motor. Also put a cap between each terminal and the motor case. 100nF should be a good value. If you have some beads, fit them on the motor leads close to the motor but NOT between the motor and it's caps.

Ensure adequate decoupling caps on ALL chips.

If the motors are uni-directional, make sure catch diodes have been fitted but also remember that what they 'catch' has to go somewhere. A low ESR electrolytic cap must be placed close to where the diode 'dumps' the charge.
 
Last edited:

westaust55

Moderator
i2c using P82B715 bus extenders

from the P82B715 i2c bus extender chip datasheet:
Multi-drop distribution of I2C-bus signals using low cost twisted-pair cables

Pull up resistors at either end are correct where there is a long wire i2c bus between two P82B715 i2c chips - see datasheet page 5. and on page 6 . . . .

If P82B715 ICs are to be permanently connected into a system it could be configured with only one pull-up resistor on the buffered bus and none on the I2C-buses, but the system design will be simplified, and performance improved, by fitting separate pull-ups on each section of the bus. When a sub-system using P82B715 may be optionally connected to an
existing I2C-bus system that already has a pull-up, then the effects of the sub-system pull-ups acting in parallel with the existing I2C-bus pull-up must be considered.

The dataseet state that the minimum pull-up resistance in a 5 V ± 10 % system is 170 ohms. low values like 470 ohms only apply for the buffered bus between two or more i2c extender chips..


I think you need to upload a block diagram to show exatly how the P82B715 are being used or reference on the the digrams from the datasheet if applicable as an example (eg as per fig 9 on page 10 - which DOES use 470 ohms at each end of the buffered section of the i2c bus). That diagram also shows optional zeners and separately ESD devices for protection.

EDIT:
thinking more after reading thru the datasheet it seems that your i2c network is most likely akin to figure 9 as I can see the i2c extender chip on the rear side view of the 28X1 remote board.

Thus the use of the 470 ohms at each end of the buffered i2c bus section is okay.

Try twisted pair wire if not already done plus some zeners as Invaderzim suggested.

Can the supply for the motors be segregated from the PICAXE supplies? At least for some tests.
 
Last edited:

Technical

Technical Support
Staff member
When the i2 bus lockups what is the voltage level seen on SDA and SCL on the bus - are they pulled low (via either the master or the slave) or pulled high by the resistors.

Also trying a
poke $14,0
poke $91, 0

at the start of the downloaded programs may possibly get the i2c working again on the next download after freeze.

But getting rid of the noise is the correct solution!
 

inglewoodpete

Senior Member
Thanks for the feedback + some anwers to q's

Many thanks for the many responses overnight, particularly the lengthy one from InveaderZim.

I have drawn a block diagram of the network principles of the existing setup. Unfortunately, it is a bit cluttered but I'm limited by the GIF pixel limits of the forum.

Each 28x1, master and all slaves, have their own P82B715 interface chips. The two units at either end of the bus are the only ones with pullup resistors, as per the data sheet.

Each motor has a ferrite bead and 0.1uF capacitor mounted close to the motor's power tags (capacitor is mounted directly on the motor, ferrite is as close as possible on the feed wires).

WA55 quotes the datasheet recommending twisted pair cable. I had wondered about that but can't figure out how to effectively use twisted pair with 2 signal wires in an unbalanced environment.

hippy: only the 28x1 slave associated with the motor gets locked up. The master continues on and communicates effectively immediately the slave reboots.

I had not seen the reference to zeners to clamp the signal wires, nor had the hardware designer: we'll add them.

Having discussed the problem with a work colleague (model train buff), he suggested isolating the H-Bridge from the low voltage/current part of the circuit. The idea being to use completely separate power feeds for the logic and motors. I'm now trying to source some quad SMD optoisolators. This will increase the bus size between drops from 4 wires to 6 wires but will keep the motor current surges out of the logic circuitry. It also means an additional 5v regulator for the logic side of the H-bridge and opto receivers.

Since we have to do a hardware redesign anyway, these changes can be incorporated in the new PCB. We may be able to breadboard an interface between the existing PCB logic and the (removed) H-bridge to prove the concept. SMD makes breadboard development very difficult.

Technical: I'll check the bus condition tonight (Aust time). Work by day, PICAXE by night....

-Peter
 

Attachments

Last edited:

westaust55

Moderator
interference on extended i2c wiring

As you say, the i2c signals do not form a balanced circuit (in the form of a loop).
To better try and achieve this and as per the datasheet, they put the SDA signal and the +5V signal into one pair and then the SCL and Gnd together in another pair.
I might have otherwise suggested 2 pairs with the second in each pair being a Gnd

A next step up is to use some 2 pair instrument cable (eg here in Australia try Olex Instrolex – was called Dekoron) which has twisted pairs and an overall screen. Then for each segment of cable only earth the screen at one end to the 0V line. This sort of instrument cable provides 100% screening by use of an aluminium foil (whereas coax and many audio cables with a braided screen only give partial screening).
 

BCJKiwi

Senior Member
I've now had a look at the data sheet and it would appear that the circuit on Fig 9 of the Philips data sheet is the one being used.

I stand by the earlier statement:-
There should only be a single pullup resistor on scl and a single pullup resistor on sda of each SEPARATE bus, not one at each end.
This is consistent with standard i2c practice and with the diagram.

By inserting the expander chip pair (or multiples) the i2c bus is actually broken at the expander. The key is that the i2c bus at each 28X1 is a standard i2c bus and extends no further than the expander chip.Therefore it is (in my view) incorrect to say there are 4k7 pullups at each end of the bus as there are actually as many separate i2c busses as there are 28X1s.
 

westaust55

Moderator
Terminations for extended i2c bus using P82B715's

We need to ensure we are all talking about the same thing.
Maybe there is confusion over the term "at each end"

IWP originally stated:
The slaves are about 1 metre apart and have a 12 volt feed for power (on-board 5v regs) and low impedance i2c bus using P82B715 i2c bus extender chips.
The bus uses 470 ohm pull-up termination resistors at either end. Each slave board has the standard 4.7k ohm pull ups on the i2c leads between the P82B715 and the 28x1.
I think that by ”The bus uses 470 ohm pull-up termination resistors at either end.” What was meant was the buffered bus has 470 Ohm resistors at each end.

“Buffered bus” is also the terms used in the datasheet at for example Figs 4 and 5.

What I stated in post 8 was:
Pull up resistors at either end are correct where there is a long wire i2c bus between two P82B715 i2c chips
low values like 470 ohms only apply for the buffered bus between two or more i2c extender chips
Thus the use of the 470 ohms at each end of the buffered i2c bus section is okay.


The attached marked up diagram from the datasheet will hopefully clarify what is intended/required.
 

Attachments

inglewoodpete

Senior Member
WA55 has it in a nutshell. (At least in my understanding: there's a nut!)

A long bus behaves like a transmission line (in this case, an unbalanced one). Hence the loading at each end.
 

hippy

Technical Support
Staff member
Each 28x1, master and all slaves, have their own P82B715 interface chips. The two units at either end of the bus are the only ones with pullup resistors, as per the data sheet.
That looks okay to me. The datasheet isn't exactly clear to me as to what the situation for pull-up R's is if you have a 'star network', multiple long cables from the master to individual salves, but as that's not your configuration you seem to match what they suggest.

hippy: only the 28x1 slave associated with the motor gets locked up. The master continues on and communicates effectively immediately the slave reboots.
That's encouraging because it does mean it's a local issue rather than a system issue so should be easier to deal with. Fingers crossed.
 

inglewoodpete

Senior Member
Update: Rather than rushing into designing a new board, we will trial a daughter board, made of strip board. By lifting the L298 off the slave board (refer to pics on post #2), we'll insert a number of optocouplers to drive the L298, which will be relocated to the daughter board.

The daughter board will be powered by a separate 12 volt feed, with its own 5v reg for the logic side of the H-bridge. If successful, we'll move on to redesign the slave board, which has a number of design problems.

The project is destined for display in New York in March 2009 (yes, the other side of the world to me). I wonder if there are any forum members in NYC?

Stay tuned.
 

inglewoodpete

Senior Member
i2c locks up when PWM is initialised: 28x1 firmware bug?

After rearranging the hardware to move all high currents off the i2c slave board, the problem persisted.

So I have disconnected all of the additional H-Bridge hardware and loaded the master and slave with the following code.

The problem appears to be a firmware bug: as soon as a PWMOut command is executed, the hi2c stops. Firmware version is 28x1 A.3

The hardware for the master and slave are identical: 2 LEDs (Outputs 0 & 1),
i2c on pins C3 &C4. Reset switch is needed on the slave, optional on the master.

I realise it is a big ask but can someone confirm that this bug can be replicated? (or am I going bonkers?)

Master
Code:
'02-Dec-2008 v2.0 123 bytes Test of i2c H/W as master (Random numbers used to fill scratchpad)

#picaxe 28x1
' 
'--------- Variable Definitions ----------------------------------------------------- 
'
	Symbol SlaveID			= b2			'w1 Slave number
	Symbol SlaveStatus	= b3			'w1 Status of slave, returned by i2c
	Symbol SucessfulSlave= b4			'w2 copy for debug
	Symbol SaveSlStatus	= b5			'w2 copy for debug
	Symbol SucessfulPosn	= w3			'b6,7
	'ymbol					= b			'w
	Symbol PosnReqd		= w4
	Symbol PosnReqdLo		= b8			'Low byte
	Symbol PosnReqdHi		= b9			'High byte
	'Symbol
	Symbol RandNum			= w11			'Required for Random number generation in prototype
'
'----------- Constants ------------------------------------------------------------ 
' 
	'Constants for random number generator range
	Symbol RandomRange	= 575	'Range for numbers: 0 to 574
	Symbol LowLimit		= 200	'Offset gives modified range of 200 to 774
	'
	'i2c signalling is always 2 bytes (1 word)    Upper 6 bits of high byte are the slave status bits.
	' i2c signal (word) between master and slave: %srttttdd %dddddddd 10-bit data
	' Where s = send handshake, r = receive handshake, t = data type, d = data
	'These masks all relate to the high byte of the pair
	Symbol i2cNumber		= %00000011	'Upper two bits of 10 bit number
	Symbol i2cCommand		= %11111100
	Symbol i2cM2SFlag		= %10000000	'Indicate data direction is master to slave
	Symbol i2cS2MFlag		= %01000000	'Indicate data direction is slave to master
	Symbol i2cDIRBits		= %11000000 'Direction bits mask 
'
'
Initialise:	PulsOut 0, 5000		'5,000 x 10nS = 50mS	Flash LED to indicate
		Pause 50 		'50mS			 that PICAXE has rebooted
		PulsOut 0, 5000		'5,000 x 10nS = 50mS
				'
		Hi2cSetup I2CMaster, %10000000, I2CSlow, I2CByte 'Only needed once.

		RandNum = 7127		'Seed the ramdom number generator
		SaveSlStatus = $FF
		Debug
SendLoop:	ptr = 0
		'			Fill scratchpad RAM with random numbers (within pole limits)
		Do Until ptr > 20	'Last Slave byte in [S]cratch[P]ad
			Random RandNum			'Generate a random number (seed must be in RandNum)
			PosnReqd = RandNum // RandomRange + LowLimit	'Trim to fit range 200 to 774 (10-bit number)
			@PtrInc = PosnReqdLo 
			@PtrInc = PosnReqdHi
		Loop
		'
		ptr = 0
		Debug
		'				Fill scratchpad RAM with random numbers (within pole limits)
		Do Until ptr > 20	'From 0 to Last Slave byte in [S]cratch[P]ad
			PulsOut 1, 5000				'5,000 x 10nS = 50mS
			SlaveID = Ptr + 2		'SlaveID is in bits 6 to 1 (bit 0 not used)
			'				 The +2 ensures that slave 0 is never addressed
			Hi2cIn [SlaveID], 1, (SlaveStatus)	'Before sending: Fetch status of Slave
					
			PosnReqdLo = @PtrInc
			PosnReqdHi = @PtrInc
			b8 = ptr					'Used for debugging
			'0
			PosnReqdHi = PosnReqdHi Or i2cM2SFlag
			If SlaveStatus != $FF Then				'Only if slave has responded
				SaveSlStatus = SlaveStatus
				SlaveStatus = SlaveStatus Or i2cS2MFlag	'Mask all but Slave to Master bit
				Debug
				Pause 100
				If SlaveStatus = i2cS2MFlag Then		'Only if slave is ready
					PulsOut 0, 50000			'50,000 x 10nS = 500mS
					SucessfulSlave = SlaveID
					SucessfulPosn = PosnReqd
					Hi2cOut [SlaveID], 0, (PosnReqdLo, PosnReqdHi) 'Send to slave s/pad loc 0, 1
				EndIf
			EndIf
			Debug
		Loop
		'			
		Goto SendLoop		'Regenerate new set of random numbers
'
'-------------------------------------------------
Slave
Code:
#PICAXE 28X1 
' 
'Minimum hardware: i2c and 2 x LEDs on Output 0 and Output 1 and reset button
'
' ***** Slave Code ********************************
	'
	PulsOut 0, 5000		'5,000 x 10nS = 50mS	Flash LED twice to indicate
	Pause 50 		'50mS						 that PICAXE has rebooted
	PulsOut 0, 5000				'5,000 x 10nS = 50mS
	'
	Poke $14, 0						'Added to reset i2c port
	Poke $91, 0						' after download (doesn't make any difference)
				
	DirsC = %00000110 			'Set pins 1 & 2 to 'Out' for possible PWM
	'PWMOut 1, 199, 0				'Initialise PWM but leave it turned off (0%)
	'
	Hi2cSetup i2cSlave, 10		'Initialise device i2c slave address
	'				'MSBs set to disable address gates
	'				'Set direction of Pen motor (never changes)
	For b13 = 1 to 4
		Put 0, 0 					'Clear i2c scratchpad
		Put 1, %01000000			'Show that Slave is ready to receive i2c data
		ptr = 0
		'
		Do	'Wait for next command
			Get 0, b4
			Get 1, b5
			b0 = b5 And %11000000
			PulsOut 1, 500				'  5mS
			Pause 40						'100mS
		Loop Until b0 = %10000000
		b5 = b5 And %00000011	'Remove all command bits
					
		b18 = w2 / 100 + 1			'Changes 0 - 1023 into (0 to 10) + 1 = 1 to 11
		Debug
		For b12 = 1 To b18			'flash led proportionately to received value
			PulsOut 1, 5000			' 50mS
			Pause 150					'100mS
		Next b12
	Next b13
	'
	Pause 2000
	PWMOut 1, 199, 0  'Initialise PWM but leave it off
	'
	For b13 = 1 to 4
		Put 0, 0 					'Clear i2c scratchpad
		Put 1, %01000000			'Show that Slave is ready to receive i2c data
		'
		Do	'Wait for next command
			Get 0, b4
			Get 1, b5
			b0 = b5 And %11000000
			PulsOut 1, 500				'  5mS
			Pause 40						'100mS
		Loop Until b0 = %10000000
		b5 = b5 And %00000011	'Remove all command bits
					
		b18 = w2 / 100 + 1	'Changes value 0 - 1023 into (0 to 10) + 1 = 1 to 11
		Debug
		For b12 = 1 To b18			'flash led proportionately to received value
			PulsOut 1, 5000			' 50mS
			Pause 150			'100mS
		Next b12
	Next b13
	'
	High 0
	High 1
Here:	Goto Here
'
'------------------------
 
Last edited:

hippy

Technical Support
Staff member
The problem appears to be a firmware bug: as soon as a PWMOut command is executed, the hi2c stops. Firmware version is 28x1 A.3
I don't have a 28X1 to hand nor anything setup for I2C. Do you get the same problem if you simplify the code; master sends I2C packet every second or so, slave toggles a LED on I2C received / payload content, prove that works then turn on PWMOUT and it all stops working ?

That would help to narrow it down to if there is a HI2C / PWMOUT interraction.

There should be no interaction in the PICmicro I can see for I2C/PWMOUT, timers used are separate and I2C Slave should be free-running, no timer involved.

Assuming there is some interaction, plucking ideas from the air, could PWMOUT be changing TRISC ? Maybe Peek $87 before and after it locks up and seeing if there is a difference to expected. Using "dirsc=??" could be an option if that's a problem.

A possible workround could be to set PWMOUT before HI2CSETUP then only use PWMDUTY afterwards rather than PWMOUT.
 
Last edited:

hippy

Technical Support
Staff member
Testing just one 28X1 I get the following and cannot see anything going wrong or unexpected interactions. However, you do seem to be using Slave Device Address 10 ($0A) which isn't recommended ( reserved for fuure use ) although it should probably work ...

Code:
Power-On...
87 TRISC  	1111 1111	FF
14 SSPCON 	0000 0000	00
91 SSPCON2	0000 0000	00
93 SSPADD 	0000 0000	00
94 SSPSTAT	0000 0000	00

Set DIRSC...
87 TRISC  	1111 1001	F9
14 SSPCON 	0000 0000	00
91 SSPCON2	0000 0000	00
93 SSPADD 	0000 0000	00
94 SSPSTAT	0000 0000	00

Enable HI2C...
87 TRISC  	1111 1001	F9
14 SSPCON 	0011 0110	36
91 SSPCON2	0000 0000	00
93 SSPADD 	0000 1010	0A
94 SSPSTAT	0000 0000	00

PWMOUT Init...
87 TRISC  	1111 1001	F9
14 SSPCON 	0011 0110	36
91 SSPCON2	0000 0000	00
93 SSPADD 	0000 1010	0A
94 SSPSTAT	0000 0000	00

PWMOUT On...
87 TRISC  	1111 1001	F9
14 SSPCON 	0011 0110	36
91 SSPCON2	0000 0000	00
93 SSPADD 	0000 1010	0A
94 SSPSTAT	0000 0000	00
Test code ...

Code:
#picaxe 28X1

Pause 2000             : SerTxd("Power-On")    : Gosub Report
DirsC = %00000110      : SerTxd("Set DIRSC")   : Gosub Report
Hi2cSetup i2cSlave, 10 : SerTxd("Enable HI2C") : Gosub Report
PwmOut 1, 199, 0       : SerTxd("PWMOUT Init") : Gosub Report
PwmOut 1, 199, 199     : SerTxd("PWMOUT On")   : Gosub Report
Do:Loop

Report:
  SerTxd("...",CR,LF)
  Peek $87,b0 : SerTxd("87 TRISC  ") : Gosub ReportBits
  Peek $14,b0 : SerTxd("14 SSPCON ") : Gosub ReportBits
  Peek $91,b0 : SerTxd("91 SSPCON2") : Gosub ReportBits
  Peek $93,b0 : SerTxd("93 SSPADD ") : Gosub ReportBits
  Peek $94,b0 : SerTxd("94 SSPSTAT") : Gosub ReportBits
  SerTxd(CR,LF)
  Return
  
ReportBits:
  SerTxd(9,#bit7,#bit6,#bit5,#bit4," ",#bit3,#bit2,#bit1,#bit0,9)
  b1 = b0 / 16
  Gosub ReportNibble
  b1 = b0
  Gosub ReportNibble  
  SerTxd(CR,LF)
  Return
  
ReportNibble:
  b1 = b1 & $0F + "0"
  If b1 > "9" Then
    b1 = b1 + 7
  End If
  SerTxd( b1 )
  Return
 

Technical

Technical Support
Staff member
Not yet tested, but it is quite possible that this is the same issue that caused the known issue between timer/pwmout (fixed in A.4). Basically the pwm operation in the PIC chip sets an interrupt flag unexpectedly (and in our opinion, wrongly!), which can then affect the operation of the other expected interrupts (such as timer or i2c receive).
If so firmware A.4 onwards may well resolve the issue, as the incorrect flag issue has been worked around.

We'll try and do some testing for you.
 

inglewoodpete

Senior Member
Response to questions, suggestions.

hippy: Do you get the same problem if you simplify the code; master sends I2C packet every second or so, slave toggles a LED on I2C received / payload content, prove that works then turn on PWMOUT and it all stops working ?
The code is simplified and does what you suggest. The master checks a range of slave addresses for a response. When a response occurs, the master's LED flashes to indicate a responsive slave is found. When the slave gets data from the host, it flashes its LED to indicate this.

hippy: That would help to narrow it down to if there is a HI2C / PWMOUT interraction.
-and-
A possible workround could be to set PWMOUT before HI2CSETUP then only use PWMDUTY afterwards rather than PWMOUT.
If I leave out the PWMOut command, the hi2c works reliably. If I put the PWMOut command in anywhere, (refer to my slave code where I have a commented-out PWMOut before the hi2cSetup), the hi2c does not communicate. Ie I can't start the PWM without killing hi2c.

hippy: However, you do seem to be using Slave Device Address 10 ($0A) which isn't recommended ( reserved for future use ) although it should probably work ...
Each slave board has a 6-bit DIP switch to set the addressing. By chance, this board was number 10 (decimal), so I replicated the address in the simplified code provided. The problem is evident with different slave addresses. The network will have 60 slaves, so we have limited choice in selecting address ranges. It will be a 'closed' network: a PICAXE master talking to 60 PICAXE slaves.

hippy: Thanks for providing the diagnostics code. I'll try that tonight (UTC +7 hours). I'm normally not one for playing with system variables.

Technical: ... if so firmware A.4 onwards may well resolve the issue
I'll wait to get confirmation that the problem can be replicated (and is solved by A.4). I'm a bit nervous about the 60 A.3s that have already been purchased.... Not my doing, but still a problem.

Other observations:
- Problem occurs when either PWM 1 or PWM 2 is used.
- PWMOut anywhere in the code stops hi2c
- Prior to running hippy's diagnostic code, there is no evidence in variables or scratchpad of a problem from the slave or the master. The issue appears to be in hardware or firmware. The master attempts to poll the slave and gets no response ($FF).
- Technical's suggestion of Poke $14, 0 & Poke $91, 0 has no effect.
 
Last edited:

inglewoodpete

Senior Member
hippy: Outputs running your diagnostic code.

After a hard reset:
Code:
ower-On...
87 TRISC  	1111 1111	FF
14 SSPCON 	0000 0000	00
91 SSPCON2	0000 0000	00
93 SSPADD 	0000 0000	00
94 SSPSTAT	0000 0000	00

Set DIRSC...
87 TRISC  	1111 1001	F9
14 SSPCON 	0000 0000	00
91 SSPCON2	0000 0000	00
93 SSPADD 	0000 0000	00
94 SSPSTAT	0000 0000	00

Enable HI2C...
87 TRISC  	1111 1001	F9
14 SSPCON 	0011 0110	36
91 SSPCON2	0000 0000	00
93 SSPADD 	0000 1010	0A
94 SSPSTAT	0011 0000	30

PWMOUT Init...
87 TRISC  	1111 1001	F9
14 SSPCON 	0011 0110	36
91 SSPCON2	0000 0000	00
93 SSPADD 	0000 1010	0A
94 SSPSTAT	0011 0000	30

PWMOUT On...
87 TRISC  	1111 1001	F9
14 SSPCON 	0011 0110	36
91 SSPCON2	0000 0000	00
93 SSPADD 	0000 1010	0A
94 SSPSTAT	0011 0000	30
After a soft reset (programme download)
Code:
Power-On...
87 TRISC  	1111 1111	FF
14 SSPCON 	0000 0000	00
91 SSPCON2	0000 0000	00
93 SSPADD 	0000 1010	0A
94 SSPSTAT	0000 0000	00

Set DIRSC...
87 TRISC  	1111 1001	F9
14 SSPCON 	0000 0000	00
91 SSPCON2	0000 0000	00
93 SSPADD 	0000 1010	0A
94 SSPSTAT	0000 0000	00

Enable HI2C...
87 TRISC  	1111 1001	F9
14 SSPCON 	0011 0110	36
91 SSPCON2	0000 0000	00
93 SSPADD 	0000 1010	0A
94 SSPSTAT	0011 0000	30

PWMOUT Init...
87 TRISC  	1111 1001	F9
14 SSPCON 	0011 0110	36
91 SSPCON2	0000 0000	00
93 SSPADD 	0000 1010	0A
94 SSPSTAT	0011 0000	30

PWMOUT On...
87 TRISC  	1111 1001	F9
14 SSPCON 	0011 0110	36
91 SSPCON2	0000 0000	00
93 SSPADD 	0000 1010	0A
94 SSPSTAT	0011 0000	30
The difference on my 28x1 F/w A.3 is that SSPSTAT is set to $30** after hi2c is configured (I don't know what that means, mind you!)

** In some (hard) reboots, SSPSTAT is set to $10 after h12c is configured and then sometimes goes to $30 after PWMOut executed (other times remains at $10). Refer to the reboot logs below:
Code:
Power-On...
87 TRISC  	1111 1111	FF
14 SSPCON 	0000 0000	00
91 SSPCON2	0000 0000	00
93 SSPADD 	0000 0000	00
94 SSPSTAT	0000 0000	00

Set DIRSC...
87 TRISC  	1111 1001	F9
14 SSPCON 	0000 0000	00
91 SSPCON2	0000 0000	00
93 SSPADD 	0000 0000	00
94 SSPSTAT	0000 0000	00

Enable HI2C...
87 TRISC  	1111 1001	F9
14 SSPCON 	0011 0110	36
91 SSPCON2	0000 0000	00
93 SSPADD 	0000 1010	0A
94 SSPSTAT	0001 0000	10

PWMOUT Init...
87 TRISC  	1111 1001	F9
14 SSPCON 	0011 0110	36
91 SSPCON2	0000 0000	00
93 SSPADD 	0000 1010	0A
94 SSPSTAT	0001 0000	10

PWMOUT On...
87 TRISC  	1111 1001	F9
14 SSPCON 	0011 0110	36
91 SSPCON2	0000 0000	00
93 SSPADD 	0000 1010	0A
94 SSPSTAT	0011 0000	30
----------------------------------
(Reset button)Power-On...
87 TRISC  	1111 1111	FF
14 SSPCON 	0000 0000	00
91 SSPCON2	0000 0000	00
93 SSPADD 	0000 0000	00
94 SSPSTAT	0000 0000	00

Set DIRSC...
87 TRISC  	1111 1001	F9
14 SSPCON 	0000 0000	00
91 SSPCON2	0000 0000	00
93 SSPADD 	0000 0000	00
94 SSPSTAT	0000 0000	00

Enable HI2C...
87 TRISC  	1111 1001	F9
14 SSPCON 	0011 0110	36
91 SSPCON2	0000 0000	00
93 SSPADD 	0000 1010	0A
94 SSPSTAT	0001 0000	10

PWMOUT Init...
87 TRISC  	1111 1001	F9
14 SSPCON 	0011 0110	36
91 SSPCON2	0000 0000	00
93 SSPADD 	0000 1010	0A
94 SSPSTAT	0001 0000	10

PWMOUT On...
87 TRISC  	1111 1001	F9
14 SSPCON 	0011 0110	36
91 SSPCON2	0000 0000	00
93 SSPADD 	0000 1010	0A
94 SSPSTAT	0001 0000	10
----------------------------------
(Reset button)Power-On...
87 TRISC  	1111 1111	FF
14 SSPCON 	0000 0000	00
91 SSPCON2	0000 0000	00
93 SSPADD 	0000 0000	00
94 SSPSTAT	0000 0000	00

Set DIRSC...
87 TRISC  	1111 1001	F9
14 SSPCON 	0000 0000	00
91 SSPCON2	0000 0000	00
93 SSPADD 	0000 0000	00
94 SSPSTAT	0000 0000	00

Enable HI2C...
87 TRISC  	1111 1001	F9
14 SSPCON 	0011 0110	36
91 SSPCON2	0000 0000	00
93 SSPADD 	0000 1010	0A
94 SSPSTAT	0001 0000	10

PWMOUT Init...
87 TRISC  	1111 1001	F9
14 SSPCON 	0011 0110	36
91 SSPCON2	0000 0000	00
93 SSPADD 	0000 1010	0A
94 SSPSTAT	0001 0000	10

PWMOUT On...
87 TRISC  	1111 1001	F9
14 SSPCON 	0011 0110	36
91 SSPCON2	0000 0000	00
93 SSPADD 	0000 1010	0A
94 SSPSTAT	0011 0000	30
 

hippy

Technical Support
Staff member
@ inglewoodpete : Thanks for doing the testing. The SSPSTAT changing probably isn't a problem or indicative of one, especially if connected to an I2C transmitter.

The problem could be an unexpected interaction caused by the underlying hardware not acting as expected as described earlier by Technical. The issue is being investigated and we'll get back to you.
 

Technical

Technical Support
Staff member
I'll wait to get confirmation that the problem can be replicated (and is solved by A.4). I'm a bit nervous about the 60 A.3s that have already been purchased....
We've done some testing and it appears to work fine with A.4. We'll update your chips, simply send them back and we will re-burn them with the latest firmware free of charge.
 

inglewoodpete

Senior Member
Due to our anxiety to keep the project moving, we ordered 3 new 28x1s from the on-line Tech Store last Thursday. They arrived in Perth late yesterday (Monday) and we successfully tested 1 today. Considering they came from the other side of the world, I'm inpressed :) :)

Interestingly, the new chips have firmware 28x1 Version A.5. I'm not sure what additional features/corrections have occurred: my copy of firmware.txt only goes up to A.3

The first batch of A.3 chips were dispatched last Friday for reflashing. We needed to keep the development moving, hence the decision to purchase of a few new chips.
 

hippy

Technical Support
Staff member
Glad to hear it's working. I'm not sure eactly what the changes were but would guess A.4 fixed the unexpected HPWM and Timer interaction, A.5 fixes HI2C and Timer the same way. Details will most likely appear in firmware.txt with the next release of the Programming Editor.

With it being the major holiday season of Christmas, postal and courier services are likely to be disrupted a little so we're pleased to hear you got your delivery.
 

jglenn

Senior Member
I stumbled on this thread due to being interested in using the I2C to control a quad D/A. Pete, does the system work yet? Over the full 60 meters of cable?

A few points that might help:

1. I2C was only intended for short distances, connecting chips on a pcb. Some sources say "a few meters", but 60 meters is a long way. Even putting the range extender chips on the ends of the cable might be stretching it. You might need them at each motor PICAXE, which is a lot of chips.

2. I've been involved in many industrial control interference cases, 5V logic is easily corrupted by higher voltage and currents running in adjacent wiring. PWM, with the sharp edges and high slew rate of current is trouble, will go right thru cable parasitics. Having separate grounds and even power supplies for the motors might help. Have you tried just turning on a LED with the PWM instead of the motor? If that does not cause crashing, you know that the problem is hardware interference. I'm not too PICAXE literate yet, just getting started, so the new versions of the software are new to me.

3. Use of shielded twisted pair cables and maybe optos might help, but adding complexity. Really, RS422 or RS485, with differential noise immunity, is the way to go. I once had a project to communicate with a certain "payload" being tested on a magnetic shaker table, we could not use wires because of the induction flux, spent a lot of money on a custom fiberoptic serial link, magnetic fields have no effect. :p
 

inglewoodpete

Senior Member
jglenn: thanks for your thoughts on i2c.

Testing to date has been over a range of a couple of metres, with the i2c bus extenders and 470ohm bus terminations. The physical hardware layout for the slaves is an 8 x 8 grid, with spacings of about 1 metre. No individual run should be greater than about 11 metres.

The i2c signalling is not 'mission critical': a missed transmission can be resent. It may be necessary to control the slaves in such a way that i2c comms only occurs when all motors are stopped, and therefore noise is minimised.

Because of the complexity of each slave board, it is cheaper* and quicker to design and build a new batch of boards than to try the build so many on breadboards/stripboards. We currenly have 1 slave prototyped on stripboard. *A$5 each in quantity.

I have made allowances for an hSerial connection to the slave boards should i2c fail when we trial the running of several slave units together.

I have found the DS3691 RS422 chip but it needs +/-5v supplies. Is anyone aware of a single rail RS422 chip with on-board -ve supply generation (like the MAX232)?
 

jglenn

Senior Member
OK, but be wary of the interference that can occur with a bunch of motors running. Standard practice is to use a fast recovery diode across the coil being chopped, works better and runs cooler than a normal diode.

As far as RS422, not sure why your chip needs bipolar supplies, I found the SN75176AP in stock at Digikey, thousands of them, for .53, it only needs 5V.

http://focus.ti.com/lit/ds/symlink/sn75176a.pdf

8 pin DIP.
 
Top