Autonomous Hexapod

BeanieBots

Moderator
Code now added:cool:
New features added

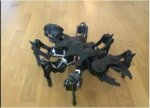
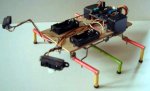
Here are some rather naff pictures. I'll update those as well at some time.
Hopefully, you can see just how simple it really is.

BUG1.jpg BUG2.jpg

Features:-
1.Plug-n-play using PICAXE AXE020 project board.
2.No soldering required (once you've made up the AXE020)
3.2X Sharp GP2D12 sensors for "eyes"
4.Only three servos to control six legs.
5.Can walk in a curve rather than just turn on the spot to avoid obsticles.
6.Uses pulsout rather than servo for "glitch free" servo control.
7.Plenty of room for improvement:)
8.Easy to build.
9.More impressive than wheels.
10.Easy to modify code to suite YOUR design & servos.

Here's the latest code which I'll update as/when new features get added.

Code:
'************************************************************
'*  22/09/2007 Added user speed & stride adjustments        *
'*  21/09/2007 Added height adjustment.                     *
'*  20/09/2007 Added variable eye sensitivity			*
'*  18/09/2007 First published on PICAXE forum			*
'*  17/09/2007 Changed a few more hard numbers into symbols *
'*  16/09/2007 Tidied up symbols & added #directives	      *
'*  19/03/2007 Added comments   				      *
'*  11/01/2007 Converted from servo to pulses 		      *
'*  31/07/2005 Autonomous BUG	Copyright BeanieBots	      *
'************************************************************

'User 'tombstone settings
'0 eye sensitivity LSB
'1 eye sensitivity MSB
'2 stride LSB 
'3 stride MSB
'4 spare
'5 Height
'6 Speed
'7 Speed

'Hardware:-
'AXE020, L293D not fitted. ULN2003 replaced with 330R resistor DIL
'8-way SIL pin header fitted next to outputs for direct servo connection
'2X Sharp GP2D12 analog IR range detectors (10cm to 80cm range)
'3X cheap hobby servos (Futaba or Hitech type connectors)
'4X AAA 900mAHr NiMh batteries & holders, Off switch & hookup wire.
'Light plywood board 170mm X 90mm, 600mm length of coat-hanger wire.
'about 700mm of 1/4" dowel for legs and optional grommets for feet
'a few squirts of expoxy glue and a few nuts & bolts.

#PICAXE 28X			'or 28X1 and easily modified for 18X
#gosubs 255			'a few too many calls to update servos to use only 16

symbol Normal_Speed=3	'Overall walking pace. (typ 5 min 3 max 9)
symbol Frame=9		'Servo update rate (also affects speed min 5 max 25)
symbol step_size=12	'default stride.(min 5 max 25)

symbol MC=150		'Center leg neutral
symbol LC=150		'Left leg neutral
symbol RC=150		'Right leg neutral

symbol H=12			'Center leg height 
symbol Lup=MC+H   	'Left up demand 
symbol Rup=MC-H		'Right up demand

symbol Adjust = infra	'reasign infra variable for tombstone values
symbol C_pos = b0		'Center leg actual position
symbol L_pos = b1		'Left leg actual position
symbol R_pos = b2		'Right leg actual position

symbol C_dem = b3		'Center leg required position
symbol L_dem = b4		'Left leg required position
symbol R_dem = b5		'Right leg required postion

symbol speed = b6		'Rate of change of leg position
symbol step_size_L = b7	'Left leg stride size
symbol step_size_R = b8	'Right leg stride size
symbol Command =  b9	'What to do (state engine value)

symbol eye_R = b10	'Right eye value
symbol eye_L = b11	'Left eye value

symbol Steps = b12	'How many steps to take for each command (state)
symbol Step_Adjust = b13'Adjustment for user selected step size

symbol L_leg = 5		'output assignment for left leg servo
symbol R_leg = 6		'output assignment for right leg servo
symbol C_leg = 7		'output assignment for center leg servo
symbol EyeInL = 0		'Left eye analog input
symbol EyeInR = 1		'Right eye analog input

symbol Normal = 1		'Command for walk straight forwards.
symbol Back_Straight =2	'Command to backup in a straight line.
symbol Back_Left = 3	'Backup to the left
symbol Back_Right = 4	'Backup to the right
symbol Turn180 = 5	'Not implemeted yet.

main:				
speed=Normal_Speed	'set up default variable values
step_size_L=-step_size
step_size_R=-step_size
command=Normal
L_dem=LC
R_dem=RC
C_Dem=MC
R_pos=R_dem
L_pos=L_dem
C_pos=C_dem

'*************************************************************
walk:					'start of main walking loop
Adjust=pin5*5			'height adjustment
C_Dem=MC+H+Adjust			'convert to center leg position demand
gosub C_UP				'raise the legs
gosub check_inputs		'find out what to do
L_dem=LC+step_size_L		'set left leg position demand
R_dem=RC+step_size_R		'set right leg position demand
gosub do_step			'do the step
Adjust=pin5*5			'height adjustment
C_Dem=MC-H-Adjust			'convert to center leg position demand
gosub C_Down			'put the legs back down
gosub check_inputs		'find out what to do
L_dem=LC-step_size_L		'set demand
R_dem=LC-step_size_R		'set demand
gosub do_step			'do the step
goto walk				'go back and repeat
'*************************************************************

Check_inputs:			'read inputs from eyes and jumpers
readadc EyeInL,eye_L		'how close are we to objects on the left?
readadc EyeInR,eye_R		'how close are we to objects on the right?

Adjust=pins & %00000011		'only use the firts two bits for eye adjustment
Adjust=11-adjust			'gives range 8 to 11. Link(s) fitted = more sensistive
eye_R=eye_R/adjust*3		'scale and granulate the Right value
eye_L=eye_L/adjust*3		'scale and granulate the left value

Adjust=pins & %11000000		'gets user speed adjustment
Adjust=Adjust/64			'scale accordingly

Step_Adjust=pins & %00001100	'get user stride adjustment
Step_Adjust=Step_Adjust*2

if Steps > 1 then Check_inputs_end	'don't change command until all steps done.

if eye_L > 14 or eye_R > 14 then	
	speed=Normal_Speed-1+adjust		'slow down a bit when object very close
	else
	speed=Normal_Speed+1+adjust		'speed up a bit if all clear
endif

'we only come here once the last command has completed ie steps=1
if command=Back_Left or command=Back_Right then
	command=Normal
endif

if command=Back_Straight and eye_R > eye_L then
	command=Back_Left
endif

if command=Back_Straight and eye_R < eye_L then
	command=Back_Right
endif

if eye_R > 10 and eye_L > 10 then	'forward path blocked
	Command=Back_Straight
endif

gosub pulse_servos			'send pulses out to servos

select case Command			'what to do for each set of conditions

	case Normal 					'normal forwards motion
	step_size_L=step_size-eye_R+step_Adjust	'reduce left step size by RHS eye value
	step_size_R=step_size-eye_L+step_Adjust	'reduce right step size by LHS eye value
	steps=2					'take 2 steps before changing
	speed=Normal_Speed+adjust		'do it at normal speed
	
	case Back_Straight 			'backwards straight
	step_size_L=-step_adjust-step_size/2		'halve the step size when going backwards
	step_size_R=-step_adjust-step_size/2
	Steps=4					'take 4 steps in this condition
	speed=Normal_Speed+adjust		'do it at normal speed
	
	case Back_Left				'back left
	step_size_L=-step_adjust-step_size/2		'halve the step size when going backwards
	step_size_R=step_adjust+step_size/2
	steps=9					'steps are smaller so do 9 in this condition
	speed=Normal_Speed-1+adjust		'do it a bit slower
	
	case Back_Right 'back right
	step_size_L=step_adjust+step_size/2
	step_size_R=-step_adjust-step_size/2
	steps=9
	speed=Normal_Speed-1+adjust	'do it a bit slower
	
endselect

check_inputs_end:				'jump to here if steps for current command not complete
Steps=Steps-1 min 1			'step complete, so reduce step counter
Return

Do_Step:
If L_pos > L_dem then L_dec		'decrement left leg position if it's too far forward
If L_pos < L_dem then L_inc		'increment left leg position if it's too far back

Do_Right:					'similar for right leg
If R_pos > R_dem then R_dec
If R_pos < R_dem then R_inc
'keep going until both actual leg positions = both demanded positions
If R_pos<>R_dem OR L_pos<>L_dem then Do_Step
Return

L_dec:
L_pos=L_pos-speed min L_dem		'move leg in correct direction by "speed" amount
gosub pulse_servos			'tell the servos to actually do it.
goto Do_right

L_inc:					'similar for the other legs
L_pos=L_pos+speed max L_dem
gosub pulse_servos
goto Do_Right

R_dec:
R_pos=R_pos-speed min R_dem
gosub pulse_servos
goto Do_step

R_inc:
R_pos=R_pos+speed max R_dem
gosub pulse_servos
goto Do_step

C_UP:'sub
if C_pos=C_Dem then C_UP_exit
C_pos=C_pos+speed+1 max C_Dem
gosub pulse_servos
goto C_UP

C_UP_exit:
gosub pulse_servos
pause 1
gosub pulse_servos
return

C_Down:'sub
if C_pos=C_Dem then C_Down_exit
C_pos=C_pos-speed-1 min C_Dem
gosub pulse_servos
goto C_Down

C_Down_exit:
gosub pulse_servos		'do this twice
pause 1
gosub pulse_servos		'to make sure legs are fully up
return

pulse_servos:			'routine that sends pulse width to servos.
pulsout C_Leg,C_pos
pulsout L_Leg,L_pos
pulsout R_Leg,R_pos
pause Frame
return
 
Last edited:

PicDaddy

New Member
Cool! I patiently await your used code. I want to build something like this too. Pulsout works better than servo command doestn it@.
 

moxhamj

New Member
I say, this is rather spiffy. Can you please take a few more closeup pictures at different angles of the underside of the hexapod - I'd like to get a better idea how all the linkages work.
 

BeanieBots

Moderator
@ picaxester. The outer legs need different stride lengths to turn and one goes forwards while the other goes back when turning on the spot. If you used another servo to do some clever mechanical things it would still require 3 servos. I'm open to any ideas to make it even simpler though.

@Dr_Acula. I did take a few closeups including the board but you can only post two pics. You should be able to see how it works from the ones I'v posted. It is VERY simple. Just a hole drilled in the leg an inch away from the servo. A bit of bent coat-hanger is poked into the hole on each leg to make the link.
The only bit that might be a bit tricky is the mounting of the idle legs. In the design shown, I used a small bearing pushed into a kitchen cupboard shelf mount. On other designs I've used nothing more than a long bolt with washers and two lock-nuts.

The core objective of most of my robots is that ANYONE can build them with very little knowledge, tools or special parts. Although this is a walker, it is probably one of the easiest to build. The clever stuff is in the code and that is not my area of expertise so even that is quite straight forward.
I'll post it tonight ready or not. It's fully functional but still has the odd bN rather than sensible name and could do with a few more comments. I also want to add user controllable speed, eye sensitivity, and leg hight (for walking on soft carpet) by use of tombstone links on the AXE020. Ran out of variables so I'll need to re-assign infrain and use the bit variables pin0 etc.
 
Last edited:

BeanieBots

Moderator
picaxester, that can go forwards & backwards.
How would it turn?
eg both left and right legs forward/backwards at the same time?
To turn an arc, the length of stride on one side must be shorter than the length of stride on the other side. How would you do that with one servo moving four legs?:confused:

I'm sure it's possible because a wheeled vehical only needs two motors. Direction and steering. So, with some clever mechanical linkages I assume it to be possible for a walker.
 
Last edited:

BeanieBots

Moderator
It's the ability to do graceful arcs around objects rather than the 'normal' stop-turn-go that many do that I think makes this particular hexapod more interesting.
 

BeanieBots

Moderator
I've updated the code to include 'user' settings.
This is done by adding 'tombstone' links to the AXE020 input port.

bits 0 & 1 allow four settings for eye sensitivity.
It was found that different settings worked better depending on how clostrophobic the surroundings were. Also, the eyes produce a constant output as the battery goes down. However, the PICAXE readadc command becomes more sensitive with lower voltage. This gets round the problem without the need for re-programming.

bits 2 & 3 give four different stride lengths.

bit 4 is not used (open to suggestions)

bit 5 is used to give two different leg heights for carpet and lino type flooring

bits 7 & 8 allow four different walking speeds.

The code is still a bit messy but it does work.
My excuse is that it was originally written for a 28A and before if/then/else was available. One day I might re-write it in a more structured way but as it works, that is probably a long way off.

Outstanding issues:-
Can get confused when at the end of a narrow dead-end. Requires a count of how many times it backs up and retries. If count greater than X, then turn through 180.

Auto-calibration of 'eyes' as battery flattens. This is not a severe problem but could easily be fixed with very little extra hardware.

Anyway, have fun with it. I have.:)
 

jodicalhon

New Member
Good stuff, BeanieBots. It's informative to walk through the code, and I found your comments quite helpful. Not sure what you mean by 'tombstone', though.

I might have a crack at building one, too.
 

BeanieBots

Moderator
Please DO "have a crack at building one".
It might not be the cheapest robot to build requiring three servos and two GP2D12s but it is very easy mechanically. The code is done for you and there is plenty of scope to improve things.
Even if your dimensions are very different, it will be easy to change the code to suit. If it walks backwards and/or turns into objects instead of away, then swap a few things over. It's all plug n' play.
I'm never far away if you do get stuck, which you won't.

'Tombstones' are those little shorting out links that fit over DIL pins. The sort of thing you find on the back of hard-drives to configure slave or master. Often called 'jumpers' or 'configuration links'.
You fit a nice fancy 8-way DIL switch but that would need wiring up.
There are two spare analog inputs which could be used for speed and/or stride control via POTs. I just wanted to keep it simple so used 'removeable links' AKA 'tombstones'.

It goes slightly against my own advise regarding power supply. I have used 4 X AAA NiMh (AAA to save weight) cells to power both the AXE020 and the servos. Normally, this would not be recommended but it works OK if the batteries are in good condition and well charged.

TIP: I made mine as big as possible for demonstration reasons. The center legs are 7.5" apart. I would suggest no more than 6" so that the center servo has enough strength to lift the body, es[ecially if you want to add a shell to make it pretty.
 

BeanieBots

Moderator
Some people have been experiencing problems porting the code to 28X1.

First, you need to change the directive "#PICAXE 28X" to "#PICAXE28X1".
Also, the 28X1 does not have the pre-defined variable "infrain".
Hence, the line:-
"symbol Adjust = infra 'reasign infra variable for tombstone values"
will fall over.
Change it to:-

Symbol Adjust = b14.

There may well be other issues.
I do not have the hardware (borrowed by local school) or a 28X1 to hand at the moment to try.
 

BeanieBots

Moderator
Hello BeanieBots,

I absolutely love the design. I was worried that it would be one of those complicated leg walkers. It even looks like it has 2 heads with those cool floating sensors. I would like to build this but your code looks so complicated and a little intimidating. I tried to study it but I don't see where you adjust the servo turns and how many degrees or how far. Your code only shows the servos at neutral 150 degrees. I'm use to seeing codes that actually state the pin number and degrees turned for each servo like this below.

Driveahead:
servo 5,75
pause 150
servo 4,120
servo 6,120
pause 150
servo 5,100
pause 150
servo 4,180
servo 6,180
pause 150
return

How do you adjust the throw of the servo arm in degrees for the left, right and center servos? Would you be willing to provide support on the code?

Also, there are other people who have built walkers and posted codes but what attracted me to yours was that you state the hexapod can walk in a curve instead of turning in place. I never seen a hexapod robot walk in a curve yet. They all seem to turn in place then continue when the area is cleared. If yours can really walk in a curve around a obstacle then it would be the best of all those designs because it allows for non-stop walking which is more interesting to me.

I wish you had a video of this hexapod walking. Please help me understand the code. I always wanted to build one of these but don't know any programming.
I was sent the above by e-mail.

It is "bad practice" to hard code numbers which might need to be changed later or may be specific to certain hardware. Taking the example shown, it would be "better" to write like this:-

Symbol LeftLegServo = 5
Symbol RightLegServo = 4
Symbol MiddleLegServo = 6
Symbol DelayTime = 150
Symbol PositionA = 75
Symbol PositionB = 100
Symbol PositionC = 120
Symbol PositionD = 180

.....
Driveahead:
servo LeftLegServo,PositionA
pause DelayTime
servo RightLegServo,PositionC
pause DelayTime
servo LeftLegServo,PositionB
pause DelayTime
servo RightLegServo,PositionD
pause DelayTime
return

If you now download the code to a different robot which has a slightly different neutral position or longer legs, you only need to change the deffinitions to make it work instead of having to go through all the code and trying to rember which servo was what leg and how it has to move.
If I've got the leg/servo assignments wrong for YOUR robot, then I've actually proved the point!

If you want the hexapod to walk in curves, then you can't use fixed values because the two extreme positions for each leg needs to change. To do that, instead of using symbol to define a number, use it to define a variable name and then (at the right place in your code) you can assign the variable the currect number. That number iteself should also be defined somewhere.

Hope that helps.
 

nbw

Senior Member
Hi there BB, what kind of servos would you use for this hexapod? I've never used servos before - but am interested in giving them a go. If they're available at Jaycar or Maplins or similar that would give me some starters.

I have one of those little crank-the-handle and a little tune is played on a metal drum things; I wanted to connect a small, slow servo to turn the drum at a set speed. A project for my 2 year old daughter. I was going to mount it in a little box with an 08M, some rechargeable AAAs, and maybe a small solar panel on the top to charge the batteries when the music box wasn't in use.

I guess the servo would have to turn quite slowly though - maybe 1 rev per second or thereabouts?
 

BeanieBots

Moderator
I used the cheapest 'standard' servos I could find. At the time, those were Hitech HS-300 from my local store at ~£5 ea.
Just about any servo will do but the center leg does require a certain amount of force to lift the robot up.

As for your other question, most servos are quite fast so might not be the best choice for 'slow' rotation.
 

Andrew Cowan

Senior Member
For that application, it would be best to modify a servo for continuos rotation (google it).

Then;
servo 150 = stopped
servo 151 = real slow
servo 225 = as fast as possible etc.

A
 
Top